

The Ultimate Homemade Chocolate Pudding: Rich, Creamy & Absolutely Delicious!
Prepare to elevate your dessert game! If you’ve been relying on store-bought mixes for your chocolate pudding fix, it’s time for a delicious revolution. Our homemade chocolate pudding recipe promises a taste, richness, and velvety texture that is truly in a league of its own, outshining any boxed variety you’ve ever tried. Every single spoonful will be a testament to the magic of making dessert from scratch.
Switching to homemade pudding might seem like an extra step, but we promise it’s simpler than you think and the rewards are immeasurable. The depth of flavor, the luxurious consistency, and the sheer satisfaction of creating this classic dessert in your own kitchen are well worth the minimal effort. Get ready to fall in love with chocolate pudding all over again!
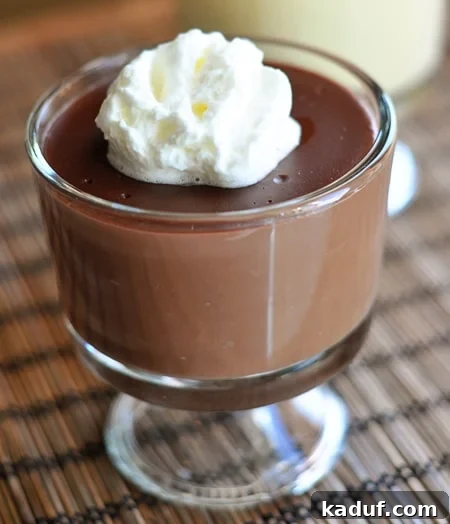
There are countless occasions when a comforting bowl of homemade chocolate pudding is just what the doctor ordered. Whether it’s a quiet evening treat, a last-minute dessert for guests, or a nostalgic delight for the whole family, having this incredible recipe in your repertoire is a true culinary asset. You’ll be surprised how often you find yourself whipping up a batch!
Quick Note: This recipe focuses specifically on our beloved chocolate pudding. For those who also adore its creamy counterpart, our fantastic vanilla pudding recipe has been moved to its own dedicated post. You can find the Best Vanilla Pudding recipe here.
The Best Homemade Chocolate Pudding Recipe
This recipe yields approximately 8 servings (or 4 cups of pudding) of decadent chocolate goodness. Its simplicity and incredible flavor make it a family favorite!
Prep Time: 5 hours (includes chilling time)
Cook Time: 10 minutes
Total Time: 5 hours 10 minutes
Average Rating: 4.60 stars from 91 ratings. Readers love this recipe!
Pin Recipe
Rate This Recipe
Ingredients
- ¼ cup (53 g) packed light brown sugar
- 3 tablespoons unsweetened cocoa powder (Dutch-process or regular)
- 3 tablespoons cornstarch
- ¼ teaspoon salt
- 2 ¾ cups whole milk
- ¼ cup heavy cream
- 1 cup (170 g) milk chocolate chips, or 6 ounces bar milk chocolate chopped
- ½ teaspoon vanilla extract
Instructions
- In a large, heavy-bottomed saucepan, begin by combining the dry ingredients: the packed light brown sugar, unsweetened cocoa powder, cornstarch, and salt. Whisk these together lightly but thoroughly to ensure there are no lumps, especially with the cornstarch and cocoa powder, which can clump easily. This dry whisking step is crucial for a smooth pudding.
- Next, gradually whisk in the whole milk and heavy cream to the dry sugar mixture. Continue whisking until the mixture is completely smooth and all the dry ingredients are fully dissolved and incorporated. Add the milk chocolate chips to the saucepan.
- Place the saucepan over medium heat. Bring the mixture to a gentle simmer, whisking or stirring occasionally to prevent the chocolate from sticking to the bottom and scorching, and to help the chocolate chips melt evenly. Once you see small bubbles beginning to break the surface around the edges, the mixture is at a simmer.
- As soon as it reaches a simmer, reduce the heat to medium-low. This is where the magic happens! Cook, whisking constantly and diligently, for 2 to 3 minutes. You’ll notice the mixture gradually thickening and large bubbles popping at the surface. Continue whisking until it reaches your desired pudding consistency – it should be thick enough to coat the back of a spoon. Do not rush this step, as proper thickening is key to the pudding’s texture.
- Immediately remove the pot from the heat. Stir in the vanilla extract. Adding vanilla after removing it from the heat helps preserve its delicate flavor, which can diminish under prolonged heat. Give it a final whisk until the vanilla is fully incorporated.
- Transfer the warm pudding to a large bowl. To prevent a “skin” from forming on top as it cools, firmly press plastic wrap directly onto the surface of the pudding. Ensure there’s no air pocket between the pudding and the plastic wrap.
- Refrigerate the pudding until it is completely cool and set, which will take at least 4 hours. For the best flavor and texture, chilling it overnight is often ideal. Stored in an airtight container, this homemade chocolate pudding will keep wonderfully in the refrigerator for up to 3 days. Serve chilled, perhaps with a dollop of freshly whipped cream, a sprinkle of chocolate shavings, or a handful of fresh berries – or simply enjoy it plain!
Nutritional Information
Here’s a breakdown of the nutritional content per serving (estimated for 8 servings):
- Serving Size: 1 Serving
- Calories: 193 kcal
- Carbohydrates: 24g
- Protein: 3g
- Fat: 10g
- Saturated Fat: 6g
- Cholesterol: 23mg
- Sodium: 119mg
- Fiber: 1g
- Sugar: 19g
(Note: Nutritional information is an estimate and can vary based on specific ingredients and brands used.)
Tips for Perfect Homemade Chocolate Pudding Every Time
- Use Quality Ingredients: The beauty of homemade pudding comes from its simple ingredients. Using high-quality milk, cream, cocoa powder, and especially good milk chocolate chips (or a chopped chocolate bar) will make a noticeable difference in the final taste.
- Whisk Thoroughly: To prevent lumps, ensure your dry ingredients are well combined before adding liquids, and then whisk continuously, especially during the thickening process. A good quality wire whisk is your best friend here.
- Mind the Heat: Cooking over medium heat initially to melt the chocolate and bring to a simmer, then reducing to medium-low, prevents scorching and ensures even thickening. Don’t crank the heat to speed things up!
- The “Skin” Solution: Pressing plastic wrap directly onto the surface of the warm pudding is a non-negotiable step to avoid that unpleasant skin from forming.
- Chill Properly: While 4 hours is the minimum, allowing the pudding to chill longer, even overnight, will result in a firmer, richer, and more satisfying texture.
- Customize Your Chocolate: While this recipe calls for milk chocolate, feel free to experiment! You can use semi-sweet chocolate chips for a slightly darker, less sweet pudding, or even a blend of milk and dark chocolate for a custom flavor profile.
Serving Suggestions & Creative Variations
This rich homemade chocolate pudding is wonderful on its own, but it also serves as a fantastic base for various delightful desserts:
- Classic Toppings: A dollop of fresh whipped cream, a sprinkle of chocolate shavings, or a few fresh raspberries are timeless additions.
- Layered Parfaits: Alternate layers of chocolate pudding with crumbled cookies (like Oreos or graham crackers), fresh fruit, or more whipped cream for an impressive parfait.
- Pudding Pie Filling: This pudding sets beautifully, making it an excellent filling for a graham cracker or Oreo cookie crust. Chill thoroughly for a decadent chocolate cream pie.
- Spiced Chocolate: For an intriguing twist, add a tiny pinch of cayenne pepper or a dash of cinnamon with the cocoa powder to introduce a subtle warmth and complexity.
- Coffee Lover’s Dream: Stir in a teaspoon of instant espresso powder with the dry ingredients for a mocha-flavored pudding that’s utterly divine.
More Delicious Chocolate Pudding & Dessert Recipes You’ll Love:
Recommended Kitchen Tools for Pudding Perfection
To make your homemade chocolate pudding experience even smoother, here are a few recommended tools: