
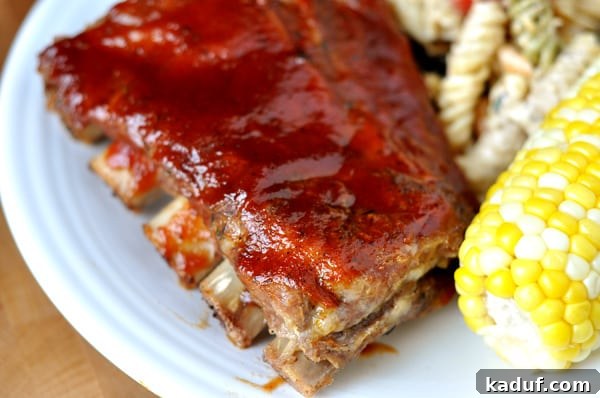
Welcome to the definitive guide for crafting the most succulent, tender, and intensely flavorful oven-baked ribs you’ll ever sink your teeth into. Forget the grill, the smoker, or complicated techniques; these fall-off-the-bone ribs are not only incredibly delicious but also remarkably simple to prepare, making them an absolute win-win for any home cook.
There are certain dishes that hold a special place in our hearts, and for my husband, Brian, that dish is undoubtedly ribs. His love for them is legendary, a deep affection that rivals even his long-standing devotion to sweet and sour chicken. And believe me, his passion for sweet and sour chicken is practically boundless, perhaps even surpassing his adoration for our firstborn child (just kidding, mostly!). This deep appreciation for perfectly cooked ribs is what inspired me to finally tackle them in my own kitchen, a culinary adventure I’d surprisingly never embarked on before.
When Father’s Day approached, the idea of preparing a magnificent rack of ribs for Brian seemed like the perfect gesture. However, attempting ribs for the very first time felt a little daunting. I wasn’t about to pick just any random recipe and hope for the best – the stakes were too high! Thankfully, a culinary lifeline appeared in the form of my dear friend, Kim, who is also the mastermind behind that phenomenal summer corn salad everyone raves about. She shared her renowned oven-baked ribs recipe, and I knew, instinctively, that it would be nothing short of stellar.
And oh, was it ever! The moment these ribs emerged from the oven, the aroma alone was enough to make your mouth water. They were impossibly tender, truly falling off the bone with the slightest nudge, and bursting with a depth of flavor that words can barely capture. This incredible taste is all thanks to a meticulously crafted dry rub and a crucial, extended marinating period that infuses every fiber of the meat with savory, sweet, and smoky notes.
What surprised and delighted me the most was just how effortlessly these ribs came together. For years, I had imagined ribs as a complicated, labor-intensive dish, reserved for pitmasters and seasoned grillers. But this recipe shattered that misconception entirely. It was so straightforward, so foolproof, that I genuinely couldn’t believe I hadn’t made them before. And neither could Brian. Since that memorable Father’s Day, he’s half-jokingly, half-seriously requested them for every meal on the calendar, determined to make up for all the lost rib-eating opportunities of the past century.
Why Oven-Baked Ribs Are the Ultimate Choice
While grilling or smoking ribs offers a distinct flavor, oven baking presents a fantastic alternative, especially for those without a smoker, during inclement weather, or when you simply want a hands-off approach to cooking. The “low and slow” method in the oven ensures consistent heat distribution, leading to exceptionally tender meat that practically melts in your mouth. This technique also makes it easier to control the cooking environment, resulting in predictably perfect ribs every time, without the constant monitoring required for outdoor cooking. Plus, the initial wrapping in foil locks in moisture and helps the flavors permeate deeply, creating a truly luxurious texture and taste that’s hard to beat.
The Secret to Unforgettable Flavor: The Dry Rub
The foundation of these outstanding ribs lies in the robust dry rub. This isn’t just a seasoning; it’s a flavor powerhouse designed to tenderize the meat and build layers of taste before a single drop of BBQ sauce is applied. Each ingredient in the rub plays a vital role:
- Light Brown Sugar: Provides sweetness, balances the spices, and aids in caramelization during the final broiling stage, creating a beautiful crust.
- Kosher Salt: Essential for seasoning and drawing out moisture, which then re-enters the meat, enhancing flavor and tenderness. Be mindful of the brand, as saltiness can vary.
- Chili Powder: Adds a foundational warmth and earthy depth without being overly spicy.
- Ground Black Pepper & Cayenne Pepper: Contribute a subtle kick and aromatic complexity. Adjust cayenne to your preferred spice level.
- Smoked Paprika: Crucial for that authentic smoky flavor, even without a smoker. Regular paprika can be used, but smoked offers a richer profile.
- Old Bay Seasoning: A unique blend of herbs and spices that adds a distinctive, savory, and slightly peppery note, elevating the overall flavor.
- Dried Thyme: Lends an aromatic, earthy, and slightly floral undertone that complements pork beautifully.
- Onion Powder & Garlic Powder: These provide concentrated, savory allium flavors that are indispensable in any good rub, offering a pungent sweetness without the moisture of fresh ingredients.
The extended marinating time (8 to 48 hours) after applying the dry rub is non-negotiable. This period allows the salt to penetrate deeply, seasoning the meat from within, while the sugars and spices work their magic, tenderizing and infusing the ribs with an incredible depth of flavor that simple basting can’t achieve.
Mastering the Prep: Removing the Silver Skin
Before applying your glorious dry rub, there’s one crucial step that can make all the difference in the tenderness of your ribs: removing the silver skin. This thin, membrane-like layer on the underside of the ribs can become tough and chewy when cooked, preventing the meat from reaching its full potential. While it might sound intimidating, it’s surprisingly easy to do:
- Locate the silver skin on the concave side of the rib rack.
- Using a small knife or the tip of a spoon, gently lift a corner of the membrane.
- Once you have a good grip, use a paper towel to pull the membrane away from the bones. It should peel off in one or two large pieces.
- If it tears, simply find another edge and continue pulling.
This simple step ensures that your ribs will be consistently tender and a joy to eat.
What to Serve With These Amazing Ribs
Complement your perfect oven-baked ribs with these delightful side dishes to create a complete and satisfying meal:
- Layered Mexican Cornbread Salad or Classic Cornbread with Fluffy Honey Butter
- Perfect Corn on the Cob or a refreshing Summer Corn Salad
- A vibrant Fresh Fruit Salad or a simple platter of sliced watermelon
- Creamy Coleslaw or a tangy Potato Salad
- Hearty Baked Beans
The Best Oven-Baked Ribs
Rated 4.65 out of 5 stars by 34 users.
Ingredients
- 2 whole slabs pork baby back ribs, silver skin removed
Dry Rub:
- 8 tablespoons light brown sugar, tightly packed
- 2 tablespoons kosher salt, Morton’s brand – other brands may vary in strength
- 1 tablespoon chili powder
- ½ teaspoon ground black pepper
- ½ teaspoon cayenne pepper
- ½ teaspoon smoked paprika or regular paprika
- ½ teaspoon Old Bay seasoning
- ½ teaspoon dried thyme
- ½ teaspoon onion powder
- ½ teaspoon garlic powder
- 1-2 cups BBQ sauce (see note below for homemade version)
Instructions
- In a medium bowl, combine all dry rub ingredients and mix thoroughly until well blended. Place each slab of baby back ribs on a piece of heavy-duty aluminum foil or a double layer of regular tin foil, ensuring the shiny side is facing down. Generously sprinkle each side of the ribs with the prepared dry rub, then gently pat the rub into the meat to ensure it adheres well. Wrap the ribs tightly in the foil, sealing the packets securely. Refrigerate the wrapped ribs for a minimum of 8 hours, ideally overnight, and up to 48 hours for maximum flavor infusion.
- When you are ready to bake the ribs, preheat your oven to 250 degrees F (120 degrees C).
- Place the foil-wrapped rib packets directly onto a foil-lined baking sheet. Bake the ribs in the preheated oven for 2 1/2 to 3 hours, or until they are incredibly tender when lifted with tongs. The meat should easily pull away from the bone at this point.
- Carefully remove the ribs from their foil packets and transfer them to a fresh, foil-lined baking sheet. Liberally brush the ribs with your favorite BBQ sauce. Place the sauced ribs under the broiler for a few minutes until the sauce is charred, bubbly, and caramelized. Alternatively, you can finish the ribs on a grill at this stage, but be gentle as they will be very tender and prone to falling apart. Once finished, cut the ribs into individual portions (typically 2-3 ribs per person). Serve immediately with additional BBQ sauce on the side, if desired.
Notes
- BBQ Sauce: For an unparalleled flavor, I highly recommend trying this homemade BBQ sauce recipe. It complements the dry rub perfectly.
- Silver Skin: As mentioned in the article, removing the silver skin from baby back ribs is crucial for tenderness. If you need a visual guide, this tutorial offers a great simplification of the process (it’s much easier than it sounds!).
- Plan Ahead: Remember that these ribs require significant refrigeration time with the dry rub (8 to 48 hours) before cooking. Be sure to factor this marinating time into your meal preparation schedule!
Nutrition Information
Serving: 1 Serving, Calories: 573kcal, Carbohydrates: 37g, Protein: 37g, Fat: 31g, Saturated Fat: 11g, Cholesterol: 130mg, Sodium: 3006mg, Fiber: 1g, Sugar: 32g
Recommended Products
This recipe was generously shared by my friend, Kim, from MD, and has become a cherished staple in our home.
Pro Tips for Oven Rib Success
- Doneness Test: The most reliable way to check for doneness is to gently lift a rack of ribs with tongs in the center. If they are perfectly cooked, the meat will be very pliable and feel like it’s about to break apart.
- Crispy Finish: The final broiling step is key for developing that irresistible caramelized, slightly crispy crust on your ribs. Keep a close eye on them, as broilers can vary in intensity and can char quickly.
- Resting Period: After removing the ribs from the oven or grill, let them rest for 10-15 minutes before slicing. This allows the juices to redistribute, resulting in more tender and flavorful meat.
- Make Ahead: You can apply the dry rub and marinate the ribs up to 48 hours in advance, making this an excellent option for entertaining or busy weeknights.
- Storage and Reheating: Leftover ribs can be stored in an airtight container in the refrigerator for up to 3-4 days. To reheat, wrap them loosely in foil and warm in a 300°F (150°C) oven until heated through, or gently microwave individual portions.
Frequently Asked Questions About Baking Ribs
- What kind of ribs are best for this recipe?
- This recipe specifically calls for baby back ribs, known for their tenderness and lean meat. You can use St. Louis style or spare ribs, but they might require a longer cooking time due to their larger size and higher fat content.
- Is it really necessary to remove the silver skin?
- Yes, absolutely! The silver skin is a tough membrane that won’t break down during cooking. Removing it ensures your ribs are incredibly tender and easy to eat.
- Can I skip the marinating step?
- While you technically *can* cook the ribs immediately after applying the rub, skipping the marinating step will significantly reduce the depth of flavor and tenderness. The extended time allows the rub to truly penetrate the meat, transforming it.
- What if I don’t have all the dry rub ingredients?
- The specified dry rub provides a balanced and complex flavor profile. However, you can certainly experiment with your favorite BBQ rub or adjust the spices based on what you have on hand. Just ensure you have a good base of salt and sugar.
- Can I use my own homemade BBQ sauce?
- Absolutely! Using your favorite homemade BBQ sauce is highly encouraged. The recipe notes link to a fantastic homemade BBQ sauce that complements these ribs beautifully.
Explore More Mouthwatering Recipes
There you have it – the ultimate guide to crafting perfectly tender, fall-off-the-bone oven-baked ribs that will impress even the most discerning rib connoisseurs. With a simple yet powerful dry rub, a crucial marinating period, and the magic of low-and-slow oven baking, you’re set to create a memorable meal with minimal fuss. So go ahead, give this recipe a try, and prepare to be amazed by the incredible flavor and ease of homemade ribs!