
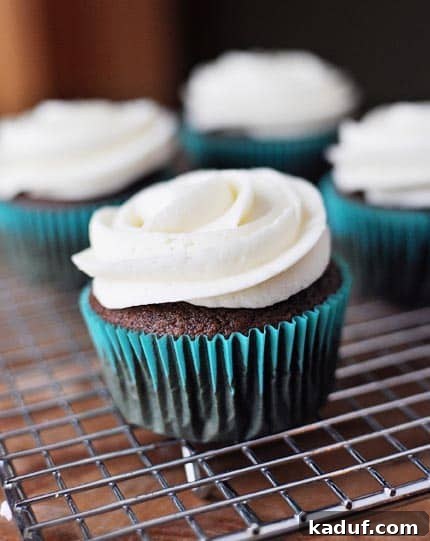
Embark on a delightful baking journey to create the ultimate homemade chocolate cupcakes. This meticulously crafted recipe guarantees cupcakes that are not just sturdy and moist, but burst with an unparalleled chocolate flavor, crowned with elegant domed tops. Prepare to experience the truly perfect chocolate cupcake.
The Quest for the Perfect Chocolate Cupcake: Achieving Bakery-Quality at Home
Every home baker dreams of that elusive perfect chocolate cupcake: a treat that’s rich in flavor, wonderfully moist, and beautifully risen with a classic domed top. For years, my go-to recipe, a trusty classic originally from the back of a Hershey’s cocoa can, delivered consistently delicious chocolate cupcakes. However, it came with a few minor frustrations. Firstly, the yield was always an awkward 30-32 cupcakes, when often, a standard batch of 24 is ideal for gatherings or family treats, making planning a bit more cumbersome. More significantly, the tops tended to be flatter than I desired, lacking that charming, rounded bakery-style dome that elevates a simple cupcake into a true work of art. While these issues were never absolute deal-breakers – after all, a delicious cupcake is a delicious cupcake, especially when smothered in frosting – I couldn’t shake the feeling that a truly flawless recipe, one that perfectly combined ease, consistent yield, and aesthetic appeal, was still out there, waiting to be discovered. This persistent pursuit of baking perfection has finally led to a recipe that I am thrilled to share, promising bakery-quality results right in your own kitchen.
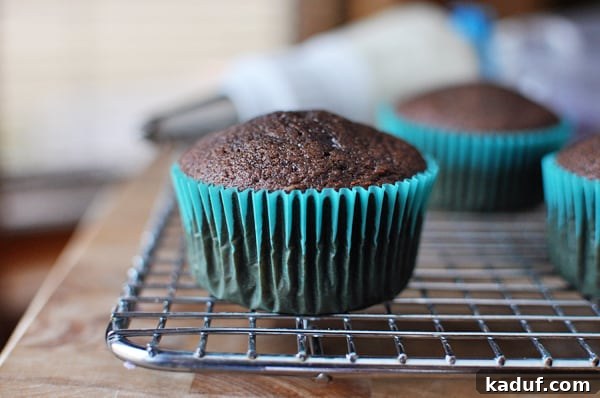
Unveiling the Ultimate Chocolate Cupcake Recipe: Moist, Fluffy, and Perfectly Domed
My diligent search ultimately led me to an extraordinary chocolate cupcake recipe that not only resolves my previous frustrations but also delivers a taste experience that is nothing short of magical. This recipe consistently yields a perfect batch of 24 decadent cupcakes, each boasting that coveted, beautifully domed shape that makes them look as good as they taste. Beyond their undeniable aesthetic appeal, these cupcakes are a triumph of texture and flavor: remarkably sturdy enough to hold generous frosting, yet incredibly moist and tender with every single bite. The profound, wonderful chocolate essence, derived from a careful balance of premium ingredients and precise technique, will delight any palate, making them an instant crowd-pleaser for any gathering. From the very first batch I baked using this method, I knew I had found my new steadfast recipe for homemade chocolate cupcakes. It’s a truly foolproof method that consistently produces results worthy of any special occasion, from elegant birthday parties to comforting family desserts, or simply for a sweet treat to brighten an ordinary day. While I still cherish my former favorite for sentimental reasons and occasional variation, having this truly perfect chocolate cupcake recipe in my repertoire brings immense satisfaction and unwavering confidence, ready to be deployed for any event demanding an exceptional chocolate indulgence.
Exploring an Egg-Free Chocolate Cupcake Alternative for Dietary Needs
Interestingly, a few weeks ago, an occasion arose that specifically required egg-free chocolate cupcakes, due to severe allergies among some of my cherished guests. Unable to rely on my new go-to recipe for egg-inclusive baking, I eagerly ventured into adapting another trusted favorite from my collection: Jackson’s Wacky Cake. This classic recipe is inherently egg-free, ingeniously utilizing the reaction between vinegar and baking soda for its leavening, which makes it incredibly versatile for such dietary considerations. I successfully modified it into a convenient and delightful cupcake format, and the results were astonishingly good! The egg-free chocolate cupcakes were remarkably tender, intensely chocolaty, and, to my sheer delight, also emerged from the oven with beautifully rounded tops, perfectly mimicking the conventional recipe’s ideal rise and appealing structure. It was a pleasant surprise to find such a fantastic alternative that didn’t compromise on flavor, texture, or elegant appearance. For those with egg allergies, or anyone looking for a reliable, moist, and delicious vegan-friendly option, this variation offers a superb solution, ensuring everyone can enjoy a delightful chocolate cupcake without compromise. I’ve since added a dedicated variation to the original wacky cake post on my site, detailing the straightforward steps to transform it into these wonderful egg-free cupcakes, making it easier than ever to cater to various dietary needs and preferences without sacrificing taste or quality.
Mastering the Art of Cupcake Frosting and Elegant Decoration
No perfect chocolate cupcake is truly complete without a luscious swirl of frosting, transforming a simple baked good into a miniature masterpiece. Achieving that elegant, bakery-style finish is surprisingly simple with the right tools and a touch of practice. For most of my cupcake creations, I frequently turn to two exceptional frosting recipes that consistently deliver outstanding results. My Quick Vanilla Buttercream recipe is a versatile and incredibly easy option, perfect for when time is of the essence or when serving a large crowd, like a group of enthusiastic kindergarteners who are often more focused on the delicious treat itself than intricate piping. This buttercream is light, fluffy, and holds its shape beautifully, making it a reliable choice. When I have a little more time and want to elevate the experience, especially for more discerning palates or a truly special event, I opt for the Magical Frosting recipe. It’s renowned for its incredible, melt-in-your-mouth texture and rich flavor, providing a truly luxurious topping that elevates any cupcake. To achieve those beautiful, flowery swipes of frosting that give a professional, inviting touch, I almost exclusively use the Wilton 1M tip, along with a few other classic large piping tips. This particular tip is incredibly versatile and allows for various elegant designs, from classic rosettes to simple, majestic swirls, with minimal effort. The key is consistent pressure and a steady hand as you pipe. If there’s enough interest from my cherished readers, I would be absolutely delighted to create a dedicated post demonstrating 2-3 classic, easy-to-master cupcake frosting designs that will instantly give your homemade treats that desirable bakery appeal. Just let me know in the comments below, and I’ll whip up a guide for you!
One Year Ago: Homemade Bagels {Step-by-Step}
Two Years Ago: Lemon Poppy Seed Sugar Cookies
Three Years Ago: Perfect Potato Salad
Perfect Homemade Chocolate Cupcakes
Pin
Review
Ingredients
- ½ cup (43 g) cocoa powder, Dutch-process or regular unsweetened, for rich chocolate flavor
- ½ cup hot water, to bloom the cocoa and enhance its depth of flavor
- 2 ¼ cups (320 g) all-purpose flour, measured correctly for tender results
- ¾ teaspoon baking soda
- ¾ teaspoon baking powder
- ½ teaspoon salt, to balance and enhance all the flavors
- 1 cup (227 g) unsalted butter, at room temperature for optimal creaming with sugar
- 1 ⅔ cups (353 g) granulated sugar
- 3 large eggs, at room temperature for better emulsion and texture
- 1 tablespoon vanilla extract, for aromatic depth and sweetness
- ¾ cup (170 g) sour cream, the secret to ultimate moistness and a tender crumb
Instructions
-
1. Prepare your workspace: Begin by preheating your oven to a precise 350 degrees F (175 degrees C). This ensures the oven is at the correct temperature for even baking. Next, line two standard 12-cup muffin pans with paper liners, preparing them to receive the batter. In a glass liquid measuring cup, combine the cocoa powder and hot water. Whisk these two ingredients thoroughly until the mixture is completely smooth and without any lumps. This crucial step, often referred to as “blooming” the cocoa, intensifies its chocolate flavor significantly, leading to a richer and more profound chocolate taste in your final product.
-
2. Combine dry ingredients: In a separate medium-sized bowl, meticulously whisk together the all-purpose flour, baking soda, baking powder, and salt. It’s imperative that these dry ingredients are thoroughly combined to allow for even leavening throughout the cupcakes, which is absolutely essential for achieving a uniform rise and consistent, tender texture. Once mixed, set this bowl aside for later use.
-
3. Melt butter and sugar: In a medium saucepan, positioned over medium heat, combine the softened butter and granulated sugar. Alternatively, for utmost convenience and minimal cleanup, you can microwave these ingredients in a large microwave-safe bowl (which you can then seamlessly use for subsequent mixing steps). Cook, stirring occasionally to prevent scorching, until the mixture is completely smooth and the butter is fully melted and incorporated. It’s important to avoid letting the mixture boil; simply melt until combined and smooth.
-
4. Cool the butter mixture: Carefully transfer the warm butter and sugar mixture to the bowl of an electric mixer (or to a large stand-alone bowl if you are using a handheld electric mixer). Beat on medium-low speed for approximately 4-5 minutes, or until the mixture has cooled considerably to just above room temperature. This cooling step is paramount to prevent the eggs from cooking and scrambling when they are added in the next stage, ensuring a smooth and cohesive batter.
-
5. Wet ingredients integration: Add the large eggs one at a time to the cooled butter mixture, beating well after each individual addition and making sure to scrape down the sides of the bowl as needed to ensure everything is thoroughly incorporated into a smooth base. Next, blend in the vanilla extract, followed by the bloomed cocoa mixture until the batter is smooth and uniformly colored, now bursting with a rich chocolate aroma. With the mixer set to low speed, gradually add the whisked flour mixture in three distinct additions, alternating each with the sour cream. Always begin and end this process with the dry ingredients. Mix each addition just until it is incorporated, being extremely careful not to overmix the batter. The precise sequence should be: add 1/3 of the flour, mix lightly; then add 1/2 of the sour cream, mix lightly; add another 1/3 of the flour, mix lightly; add the remaining sour cream, mix lightly; and finally, finish with the last 1/3 of the dry ingredients, mixing just until combined and the batter is smooth.
-
6. Fill the liners: Divide the perfectly blended batter evenly among the prepared cupcake liners. It is crucial to fill each liner no more than two-thirds full to allow ample room for the cupcakes to rise beautifully and achieve those desirable domed tops without overflowing or creating an undesirably flat surface. For bakers living at high altitudes or those who have experienced issues with overflowing cupcakes in the past, a helpful troubleshooting tip is to test bake: fill one liner only halfway with batter and bake it alone first to observe precisely how it rises and behaves in your specific oven conditions. Adjust the filling levels for the rest of the batch accordingly based on this initial test, ensuring perfect results.
-
7. Bake and cool: Bake the cupcakes for approximately 15-18 minutes. The exact baking time may vary based on the calibration and specific characteristics of your oven and the size of your cupcakes, so always keep a close eye on them. You’ll know they’re perfectly ready when a clean toothpick inserted into the very center of a cupcake comes out clean, indicating they are fully cooked through and moist. Once baked, promptly remove the cupcake pans from the oven and transfer the hot cupcakes to a wire rack to cool completely. This essential cooling step is vital as it ensures the frosting doesn’t melt and slide off, and allows the cupcakes to set properly, retaining their perfect shape and delectable moistness.
Recipe Notes & Expert Tips for Perfect Results
Choosing Your Cocoa Powder: This versatile recipe works beautifully with both Dutch-process cocoa and regular unsweetened cocoa powder, offering slight variations in flavor and color. Dutch-process cocoa, which is processed with an alkali, tends to yield a darker, richer color and a smoother, milder chocolate flavor, often without the acidity found in natural cocoa. Regular unsweetened cocoa, on the other hand, is more acidic and typically provides a slightly sharper, more intense chocolate profile, which some bakers prefer. Feel free to experiment with both types to discover which taste profile you prefer for your perfect homemade chocolate cupcakes.
The Undeniable Importance of Room Temperature Ingredients: This is arguably one of the most critical steps for achieving a smooth, uniformly mixed, and beautifully emulsified batter. Using room temperature butter and eggs contributes significantly to the cupcakes’ renowned moist and tender crumb. Cold butter will not cream properly with sugar, leading to a lumpy batter, while cold eggs can cause the batter to curdle and result in a denser, less desirable texture in the final baked good. For best results, plan ahead and let your butter and eggs sit out for at least 30-60 minutes before you begin your baking process.
A Gentle Hand: The Golden Rule of Not Overmixing: Once you begin the stage of adding the dry ingredients (flour mixture) and the sour cream, it is paramount to mix the batter only until the ingredients are just combined. Overmixing can very quickly develop the gluten in the flour too much, which leads to tough, dry, and chewy cupcakes rather than the desired light, fluffy, and tender texture. A light hand and careful attention during this final mixing stage will ensure your cupcakes remain wonderfully delicate and moist.
Cooling Completely for Flawless Frosting: Always allow your freshly baked cupcakes to cool completely on a wire rack before attempting to apply any frosting. This might require a little patience, as cooling can take up to an hour or more depending on your kitchen’s temperature, but it’s an absolutely essential step for a perfect finish. Frosting warm or even slightly warm cupcakes will inevitably cause the frosting to melt, slide off, and create a messy, unappealing finish, completely ruining your beautiful decorations and hard work. Patience here ensures a picture-perfect, professional-looking final product that you’ll be proud to serve.
Nutrition Information (Per Cupcake)
Recommended Baking Equipment
Recipe Source: This classic chocolate cupcake recipe has been adapted slightly from Annie’s Eats, providing the foundational excellence for our perfected version. The egg-free cupcake recipe is a clever adaptation from Jackson’s Wacky Cake, offering a delicious and reliable alternative for specific dietary needs, ensuring everyone can enjoy a truly great chocolate cupcake.
Other Irresistible Cupcake Recipes to Explore: