

Prepare to be amazed by these incredible Peanut Butter Kitchen Sink Cookies! They truly have everything but the kitchen sink – soft, chewy, crunchy, sweet, salty, and utterly caramelly perfection in every single bite.
There are cookies, and then there are *these* cookies. Imagine a confectionary masterpiece that perfectly balances an array of textures and flavors: the tender chewiness of a classic peanut butter cookie, the delightful crunch of pretzels and toasted nuts, the luscious sweetness of chocolate and M&Ms, and the melt-in-your-mouth richness of caramel. These aren’t just cookies; they’re an experience, a symphony of sensations that will leave you craving more long after the last crumb is gone. They are the ultimate “everything-but-the-kitchen-sink” indulgence, designed to captivate your taste buds with every glorious mouthful.
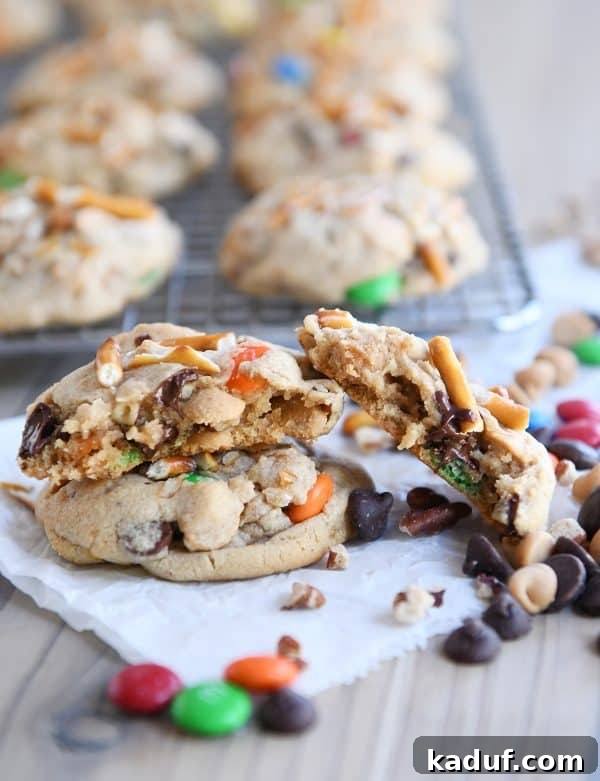
My culinary journey with these extraordinary cookies began during a summer visit to Montana, where my wonderful sister-in-law, Erin, unveiled them. The moment I tasted them, I knew my blog wouldn’t be complete without a similar recipe. They were so irresistibly delicious that she ended up baking them for us two days in a row, a testament to their immediate popularity and the insatiable demand from our “greedy hands.”
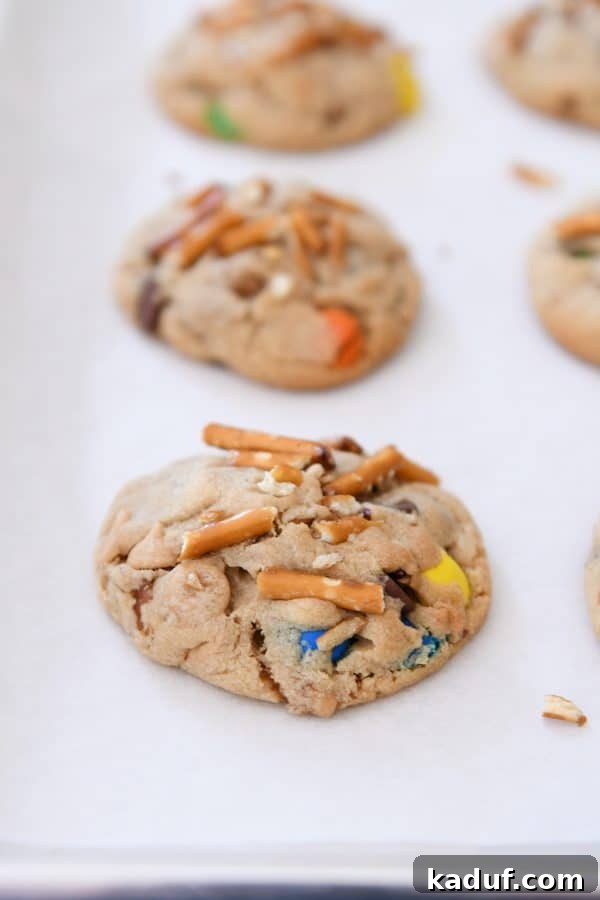
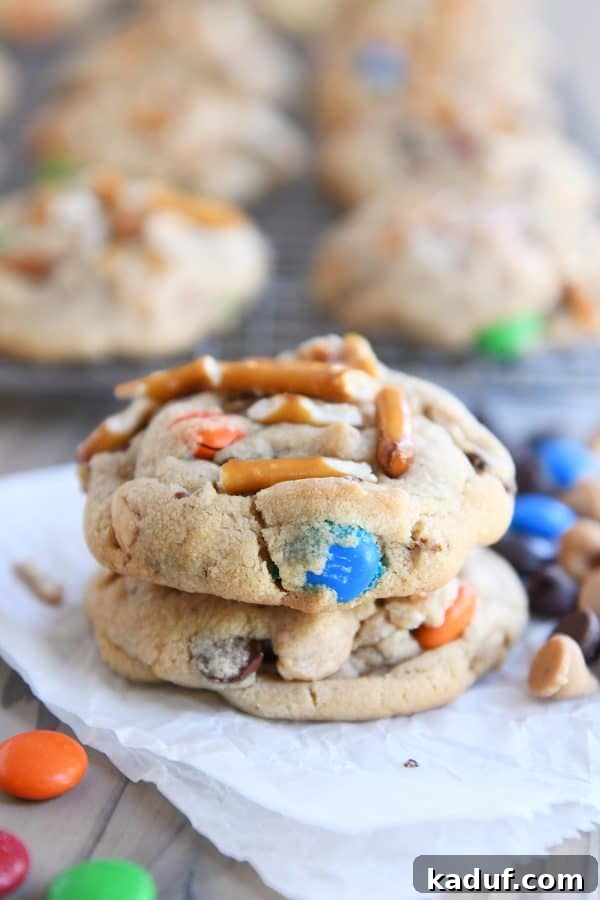
Since that memorable trip, I’ve perfected this recipe, baking these cookies four or five times myself. This includes preparing a staggering 150 of them for my cousin’s wedding dinner just a few weeks ago! Without a doubt, these Peanut Butter Kitchen Sink Cookies have skyrocketed to the top of my favorite cookie list. Just one look at their wonderfully rustic, jam-packed appearance reveals their immense “wow” factor, promising an unforgettable treat.
The Humorous Origins of “Kitchen Sink Cookies” (A Mostly Relevant Story, I Promise)
The term “kitchen sink cookies” often conjures images of a delightful mishmash of ingredients – a culinary free-for-all where anything goes, resulting in a surprising harmony of flavors. However, my earliest memory of “kitchen sink cookies” is rooted in a much more literal, and frankly, hilarious (in retrospect) context.
Back when I was around ten years old, living in Houston, Texas, my mom had a church duty to check in on the young, nineteen-year-old missionaries serving in our area. One day, during her visit – which often involved a subtle check on the cleanliness of their notoriously neglected apartment – they proudly announced that they had baked cookies and sent them home to their families! Given their incredibly sparsely furnished kitchen, my mom was quite taken aback. She politely inquired about the type of cookies they had made. “Chocolate Chip,” they declared.
Then, with a gentle yet probing tone, she asked what they had used to mix the dough, knowing they possessed little more than a couple of cereal bowls, plates, and a few utensils. Unabashed and beaming with ingenuity, they announced their brilliant solution: lacking a large mixing bowl, they had simply used their kitchen sink to combine the ingredients! (They had, thankfully, borrowed baking sheets from a neighbor.) A few more discreet questions from my slightly aghast mom revealed the truly unsettling detail: no, indeed, the rather grimy kitchen sink had not been thoroughly scrubbed clean *before* their ambitious cookie-making endeavor.
I distinctly remember my mom coming home, her brow furrowed in a mixture of bewilderment and concern, recounting this “kitchen sink cookie” experience. She wondered aloud if she should somehow alert the unsuspecting families who might be on the receiving end of these unique treats. I still have no idea if those 1980s cookies ever reached their destination or what the outcome was, but the thought of them has always evoked a bit of a gag reflex.
Rest assured, the Peanut Butter Kitchen Sink Cookies I’m sharing with you today are a delicious, metaphorical interpretation of the name. No actual kitchen sinks were used or harmed in the making of these treats! They are 100% delightful, perfectly food-safe, and guaranteed to bring joy, not gastrointestinal distress. It’s truly incredible how a term can evolve from a slightly horrifying anecdote into a beloved baking concept, signifying a cookie brimming with an exciting variety of delicious mix-ins.
The spirit of these cookies lies in their boundless potential for customization. In fact, after sharing a sneak peek of these on Instagram, our wonderful community rallied to suggest the most creative names for them. My 12-year-old even lovingly compiled a list from the hundreds of amazing responses. It’s clear that the idea of a cookie packed with everything but the kitchen sink truly resonates with adventurous bakers!
Here are a few notable and clever favorites from the suggestions:
- G.O.A.T. (Greatest Of All Time) Cookies: Because once you taste them, you’ll agree!
- Whatcha-Mel-Callsit Cookies: A playful nod to the mystery of all the wonderful ingredients.
- What You Find Under the Carseat Cookie: Slightly gross, but undeniably funny and relatable to parents everywhere.
- Spanx Busters: A humorously accurate description of their irresistible indulgence.
- Pantry Cleanout or Pantry Raid Cookie: Perfectly captures the essence of using whatever delicious bits you have on hand.
- Pretzel Monster Cookies: Highlighting one of their most addictive textural elements.
- Mary Poppins Cookie: Because, much like Mary Poppins, they are “Practically Perfect in Every Way.”
Despite their impressive list of ingredients, these Peanut Butter Kitchen Sink Cookies are surprisingly simple to prepare. They aren’t any more difficult to whip up than your average, everyday drop cookie. The real magic happens with the explosion of flavors and textures, not with complex techniques.
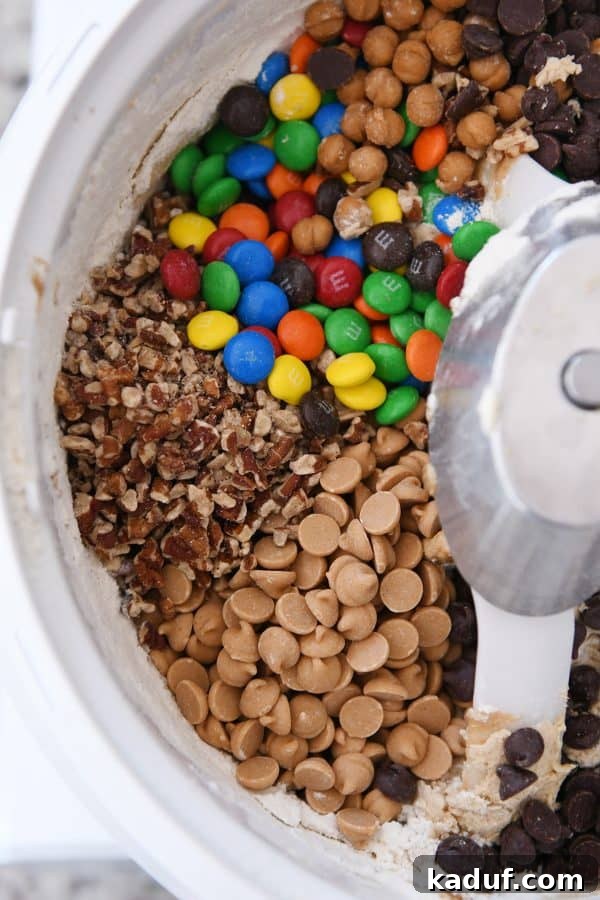
The foundation of these cookies is a wonderfully soft and rich peanut butter cookie dough. This base is easily mixed in a stand mixer or with an electric hand mixer. The key is to incorporate the flour just barely before gently folding in all those glorious extras. This ensures a tender crumb that perfectly complements the myriad of additions.
Crafting Your Perfect Kitchen Sink Cookie: The Art of the Add-In
The beauty of a “kitchen sink” cookie lies in its versatility and endless customization possibilities. The recipe as written is already a masterpiece, but it’s truly a canvas for your culinary imagination. The answer to “Can I add something else?” is a resounding YES! These cookies are designed to be a delightful clean-out-the-pantry adventure, allowing you to personalize every batch.
Here’s what’s currently going into these incredible cookies, and why each plays a vital role:
- Toasted Pecans: I admit, I’m usually not one to put nuts in my cookies, but in these, they are absolutely essential! Toasting them first brings out a deeper, richer, buttery flavor and adds a satisfying crunch that beautifully contrasts with the soft cookie dough. Don’t skip this step – they elevate the cookie significantly.
- Peanut Butter Chips: These enhance the already fantastic peanut butter base, providing bursts of intense peanut butter flavor and a creamy texture that melts wonderfully.
- Chocolate Chips: A classic for a reason! Semisweet chocolate chips provide a delightful sweetness and richness that perfectly complements the peanut butter and other salty elements. They melt into gooey pockets of deliciousness.
- Caramel Balls (or Chopped Soft Caramels): These are a game-changer. I specifically refer to the Kraft brand of unwrapped caramel bits, which are similar in size to large chocolate chips and are usually found in the baking aisle. When these aren’t available, unwrapping and cutting soft caramels (like Kraft or Trader Joe’s) into pieces with a bench knife is a labor of love that is totally and completely worth it. These caramels soften and become wonderfully gooey and chewy within the cookie, adding a decadent, buttery sweetness that is irresistible.
- M&Ms: Beyond adding vibrant pops of color, M&Ms bring another layer of chocolatey goodness and a slight candy shell crunch. I’ve successfully used regular M&Ms, dark chocolate M&Ms, and even caramel M&Ms, each adding their own unique twist.
Now, let’s explore even more exciting possibilities for your “kitchen sink” creations! I think you could play with the add-ins to your heart’s content. Consider these variations to make these cookies truly your own:
- Other Chopped Candy Bars: The sky is truly the limit here! Think about Snickers, Twix, Heath bars (for a toffee crunch), Milky Way, or even Butterfingers for an extra peanut-buttery, crunchy element. Chop them into bite-sized pieces for even distribution.
- Pretzels IN the Dough vs. Just Pressed on the Outside: While pressing pretzels on the outside offers a beautiful aesthetic and satisfying initial crunch, incorporating some finely crushed pretzels directly into the dough adds a subtle salty-crunchy texture throughout the entire cookie. This can be a delightful textural surprise.
- Other Types of Chopped Nuts: Almonds, walnuts, or cashews can offer different flavor profiles and textures. Lightly toast them beforehand to enhance their natural oils and crunch.
- Coconut: Shredded or flaked coconut, especially toasted, adds a tropical sweetness and a delightful chewy texture. It pairs surprisingly well with peanut butter and chocolate.
- White Chocolate Chips or Butterscotch Chips: For those who love a different kind of sweetness, these chips can complement the existing flavors beautifully.
- Toffee Bits: Heath English Toffee Bits or similar products add a rich, buttery, and crunchy element that elevates the cookie to a gourmet level.
- Mini Marshmallows: For a s’mores-like twist, mini marshmallows can be added towards the end of baking, creating gooey, toasted pockets of sweetness.
- Dried Fruits: While less common in a kitchen sink cookie, a small amount of chopped dried cranberries or cherries could add a tart chewiness that cuts through the richness.
- Different Types of Pretzels: Consider mini pretzel twists or even pretzel rods broken into pieces for varying shapes and sizes of salty crunch.
- Sprinkles: For a festive or fun touch, colorful sprinkles can be folded into the dough, especially for holiday or birthday batches.
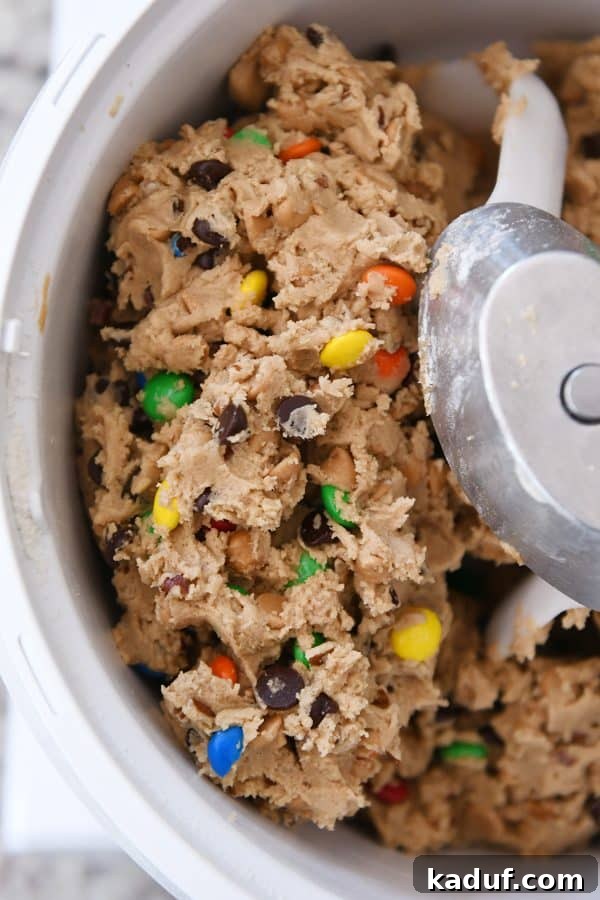
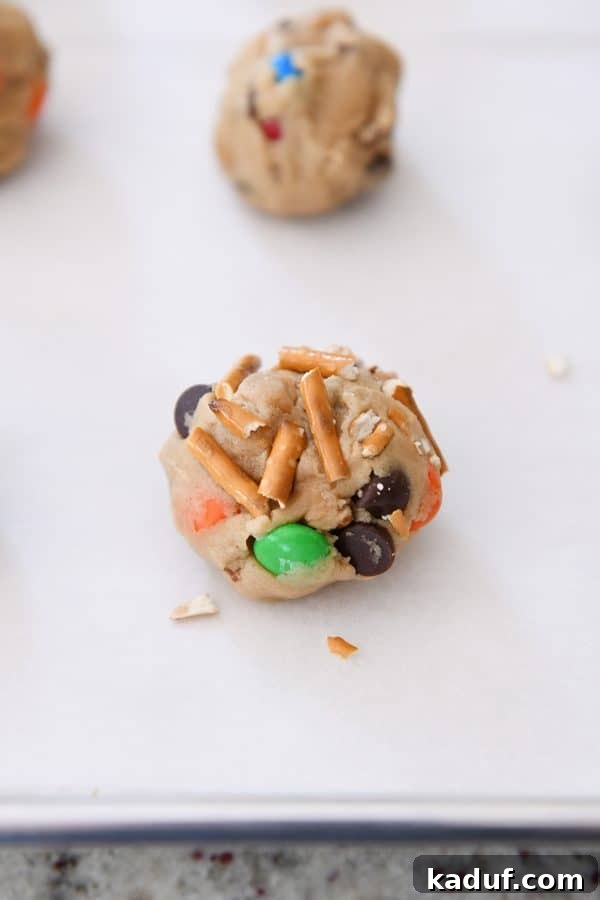
Once your irresistible cookie dough is perfectly mixed, it’s time to shape these magnificent treats. Roll the dough into generously sized balls. Due to the abundance of all the glorious add-ins, these dough balls won’t be perfectly smooth spheres – and that’s exactly how they should be! Those delightful lumps and bumps are simply indicators of extra yumminess waiting to be discovered.
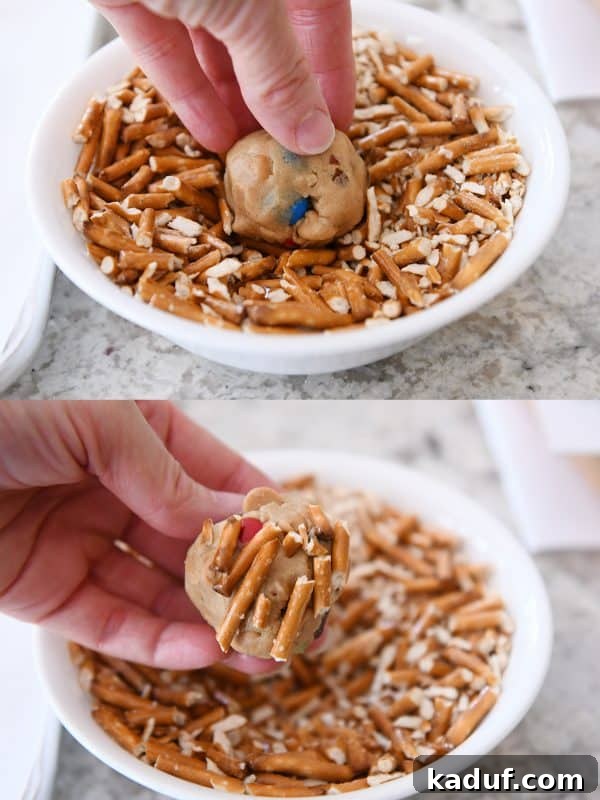
For that signature salty crunch and distinctive “kitchen sink” aesthetic, press the top of each cookie dough ball firmly into a bowl of coarsely chopped pretzels. Then, gently turn the ball over and lightly press the pretzels into the soft cookie dough, ensuring they adhere well. Again, there’s no need to strive for perfection here! These cookies embrace a wonderfully rustic, almost porcupine-spiked vibe, and I adore them all the more for their charmingly imperfect appearance.
Of course, you can certainly choose to eliminate the pretzels from your cookie lineup if they’re not your preference. However, I highly recommend keeping them; they contribute a fantastic salty crunch that beautifully complements the sweetness and richness of the other ingredients. A significant advantage is that these pretzels retain their crispness even after baking, avoiding any dreaded sogginess.
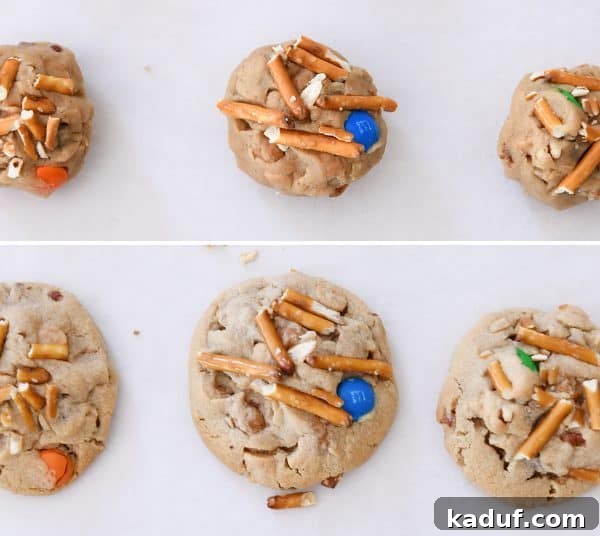
When baking, these cookies will spread, much like other drop cookies. However, don’t expect them to flatten out as much as a typical cookie, thanks to the sheer volume and bulk of all those amazing add-ins. They are designed to be wonderfully super soft, delightfully chewy, and possess a slightly puffy texture that holds all those delicious inclusions in place.
Achieving your desired cookie texture and shape is an art, and I’ve included some helpful notes in the final instruction step of the recipe. If you prefer a slightly flatter cookie, you can gently press the dough balls into more of a disc shape before baking, or try baking them at a slightly lower temperature of 325 degrees F. Conversely, if you find your cookies are flattening out too much for your liking, increasing the baking temperature to 375 degrees F can help them set more quickly, resulting in a puffier cookie. These subtle adjustments allow you to perfectly tailor your Peanut Butter Kitchen Sink Cookies to your personal preference.
Since these delightful cookies have also been affectionately dubbed “clean out the pantry cookies,” I am eagerly anticipating the incredible variations you creative and adventurous bakers will conjure up! Your endless ingenuity and willingness to experiment never cease to amaze me. Whether you stick to the recipe or unleash your inner mad scientist, I am confident you’ll create something truly spectacular.
Smart Baking: A Quick Note About Freezing
Life happens, and sometimes you might find yourself with an abundance of these irresistible cookies – perhaps more than your self-control can safely handle! Or, you might be a savvy planner who needs to bake a large batch in advance for an event or future cravings. The good news is, these baked and cooled cookies freeze exceptionally well. Yes, even with the pretzels, they maintain their texture and flavor beautifully!
To freeze, simply stack the cooled cookies between sheets of wax paper or parchment paper in a large, airtight container or freezer bag. This prevents them from sticking together and helps protect them from freezer burn. When you’re ready to enjoy them, simply take them out of the freezer several hours before you plan to serve them. Allow them to thaw at room temperature. They will taste just as delicious and fresh as the day they were baked, ready to bring instant joy whenever the craving strikes.
After all this passionate talk about the sheer deliciousness of Peanut Butter Kitchen Sink Cookies, it seems only right that I follow my own advice. Excuse me while I grab a couple from the freezer right now – just to remind myself, of course, how truly amazing they are. You should do the same!
One Year Ago: Monterey BBQ Chicken Pasta {One Pot Dinner!}
Two Years Ago: Fresh Zucchini and Tomato Linguine {30-Minute Meal}
Three Years Ago: Tender Grilled Pork Chops
Four Years Ago: Triple Chocolate Zucchini Cookies
Five Years Ago: Good Morning Power Muffins {Full of Whole Grains and Superfoods!}
Six Years Ago: Ebelskivers: Puffy Danish Pancakes
Seven Years Ago: Cheesy Zucchini Rice
Eight Years Ago: Oreo Cheesecake Bites

Peanut Butter Kitchen Sink Cookies
Pin
Rate
SaveSaved!
Ingredients
- 1 cup (227 g) salted butter, softened
- 1 cup (255 g) creamy peanut butter (I use Skippy or Jiffy)
- 1 cup (212 g) granulated sugar
- 1 cup (212 g) packed light or dark brown sugar
- 1 teaspoon baking powder
- 1 teaspoon baking soda
- ¾ teaspoon salt
- 2 large eggs
- 2 teaspoons vanilla extract
- 2 ½ cups (355 g) all-purpose flour
- 1 cup (170 g) chocolate chips (I use semisweet)
- 1 cup (170 g) peanut butter chips
- 1 cup (198 g) caramel balls (see note) or chopped soft caramels
- 1 cup (198 g) M&Ms (regular, caramel, etc)
- 1 cup (120 g) chopped, toasted pecans
- 2 cups coarsely chopped pretzels
Instructions
-
Preheat the oven to 350 degrees F (175 degrees C) and line a couple baking sheets with parchment paper.
-
In the bowl of an electric stand mixer fitted with the paddle attachment or in a large bowl using a handheld electric mixer, cream together the softened butter, creamy peanut butter, granulated sugar, brown sugar, baking powder, baking soda, and salt. Mix until the mixture is well-combined and super creamy, about 2-3 minutes, making sure to scrape down the sides of the bowl as needed to ensure everything is thoroughly incorporated.
-
Add the large eggs and vanilla extract to the creamy mixture. Mix thoroughly for 1-2 minutes until everything is well combined and the mixture is light and fluffy.
-
Gradually add the all-purpose flour, mixing briefly until the flour is just partly combined. Avoid overmixing at this stage to keep the cookies tender. Then, add in all the delicious extras: chocolate chips, peanut butter chips, caramel pieces, M&Ms, and toasted pecans. Stir with a sturdy wooden spoon or spatula (or mix very slowly with the electric mixer on the lowest setting) until all the add-ins are evenly distributed throughout the dough.
-
Scoop out generous tablespoons of cookie dough (a #40 cookie scoop works perfectly for consistent sizing) and roll them into balls. Embrace the fact that they won’t be perfectly round due to all the wonderful add-ins – those charming bumps and lumps are what make them special. Press the top of each cookie ball into the coarsely chopped pretzels. Then, gently turn the ball over and lightly press the pretzels into the soft cookie dough to ensure they stick. Place the prepared cookie dough balls several inches apart on the parchment-lined baking sheets.
-
Bake for 9-11 minutes. These cookies tend to remain fairly puffy, a delightful characteristic thanks to the generous amount of add-ins. For those who prefer a slightly flatter cookie, you can gently press them into more of a disc-shape before baking, or experiment by baking them at a slightly lower temperature of 325 degrees F (160 degrees C). Conversely, if you notice your cookies are flattening too much during baking, try increasing the oven temperature to 375 degrees F (190 degrees C) to help them set more quickly. Once baked, allow cookies to cool on the baking sheets for a few minutes before transferring to a wire rack to cool completely.
Notes
Recommended Products
Recipe Source: from Mel’s Kitchen Cafe (inspired from a recipe my sister-in-law, Erin, made for us in Montana this summer)