Experience the joy of homemade Naan (Indian Flatbread) – perfectly soft, chewy, and ideal for complementing any meal. This from-scratch recipe simplifies the process, making authentic Naan accessible to every home cook, whether you’re new to baking or a seasoned pro.
There’s an undeniable magic in pairing a fluffy, warm piece of Naan with your favorite Indian dishes. Imagine a rich butter chicken, a hearty bean curry, or a fragrant coconut curry, served alongside freshly baked, pillowy Naan. The subtle tang and soft texture of this traditional Indian flatbread don’t just complement; they elevate the entire dining experience, inviting you to scoop up delicious sauces and tender rice with unmatched satisfaction. Beyond Indian cuisine, Naan proves its remarkable versatility by making a wonderful accompaniment to a wide range of meals, from Mediterranean spreads to simple weeknight dinners.

The Unrivaled Pleasure of Homemade Naan
While convenient, store-bought Naan often falls short when compared to the fresh, tender, and subtly buttery flavor of a homemade batch. This specific Naan recipe, rigorously tested and perfected over many attempts, promises an irresistibly tender, light, and flavorful flatbread that will truly blow any pre-packaged alternative out of the water. The process of making Naan from scratch might seem a little intimidating, especially for those new to baking with yeast, but we assure you – the results are incredibly rewarding and the steps are simpler than you might imagine.
Beyond its traditional role as a side dish, homemade Naan unlocks a world of culinary creativity. Leftover Naan, for instance, transforms effortlessly into delightful mini-pizzas, creating a quick and customizable meal that’s a hit with both kids and adults. While not a traditional Indian application, this creative use highlights the adaptability and deliciousness of fresh Naan, making it a staple in any kitchen.
Demystifying Yeast: Your Beginner-Friendly Guide to Perfect Dough
The mere mention of “yeast” can sometimes cause trepidation among home bakers. But please, don’t let the yeast monster scare you away! Naan, along with other popular flatbreads, serves as an excellent entry point for anyone looking to gain confidence in working with yeast. Understanding the basic principles of yeast activation and dough handling is fundamental to success, and this recipe provides clear, detailed instructions designed to guide you through every step of the process.
In baking, you’ll most commonly encounter two types of yeast: active dry yeast and instant yeast. Active dry yeast typically requires “proofing” – a step where you mix it with warm liquid (ideally between 105-115°F or 40-46°C) and a pinch of sugar. This process ensures the yeast is alive and active before it’s combined with your other ingredients. You’ll observe a foamy layer forming on the surface, which is a tell-tale sign that your yeast is happily consuming the sugar and producing gas. Instant yeast, conversely, is more resilient and activates more rapidly, often allowing you to mix it directly with your dry ingredients without prior proofing. This recipe is thoughtfully structured to accommodate both types, offering maximum flexibility based on what you have in your pantry.
Should you ever have questions or face challenges when baking with yeast, remember that every baker started somewhere. The journey of learning to bake is filled with delicious discoveries, and resources like this detailed tutorial on working with yeast are invaluable for understanding the nuances of dough. My lifelong culinary mission is to transform every home cook into a confident bread, yeast, and dough expert!

Frequently Asked Questions About Naan Indian Flatbread
Absolutely! Cooking Naan on the stovetop in a hot cast iron skillet or heavy griddle is a fantastic, traditional alternative to using an oven or pizza stone. To do this, preheat your pan over medium-high heat until it’s smoking slightly. Cook each Naan for 1-2 minutes per side, or until it beautifully puffs up and develops those desirable golden-brown, charred spots. This method often results in a wonderfully chewier Naan with a distinctive smoky flavor.
Yes, homemade Naan freezes exceptionally well, making it perfect for meal prep! Once your Naan has been cooked and has cooled completely, stack the pieces with sheets of parchment paper in between them to prevent sticking. Then, transfer the stack into an airtight freezer bag or container. They will keep beautifully in the freezer for up to 2-3 months. To reheat, you can warm them in a dry skillet over medium heat, microwave them briefly until soft, or wrap them in foil and heat in a moderate oven until warm and pliable.
Having a pizza stone is ideal, but it’s certainly not a requirement for making delicious Naan! As mentioned, a well-seasoned cast iron frying pan or a sturdy griddle used on the stovetop works wonderfully. Another excellent oven-based alternative is to preheat a standard metal cookie sheet or heavy baking tray upside down in your oven at its highest temperature (500°F or 260°C). This creates a super-hot surface that mimics a pizza stone, ensuring your Naan puffs up with that characteristic airiness. You can also achieve fantastic results by cooking Naan on a lightly oiled outdoor grill, which imparts a lovely char and smoky aroma.
Absolutely! This Naan recipe scales up with great success, so feel free to double it if you’re entertaining a large group or simply want to stock your freezer with extra Naan. When doubling, ensure you use a sufficiently large mixing bowl to accommodate the increased dough volume during mixing and especially during its initial rise. While the individual cooking time per piece remains short, remember that the overall cooking session will naturally be longer when preparing a larger batch.
One Year Ago: Citrus Water Punch
Two Years Ago: Perfect Lemon Cake
Three Years Ago: Chocolate Mint Brownies

Naan – Indian Flatbread Recipe
12
pieces of naan
2 hours
hrs
45 minutes
mins
5 minutes
mins
2 hours
hrs
50 minutes
mins
Pin Recipe
Ingredients
-
3-4 cups
(426 to 568 g) all-purpose flour - 1 teaspoon salt
- ½ teaspoon active dry or instant yeast
- 1 ½ cups milk
- 1 teaspoon sugar
- 3-4 tablespoons, melted butter, for brushing
Instructions
-
Pour the milk into a liquid measuring cup and gently heat it in the microwave until it reaches a warm temperature, about 110 degrees F (43 degrees C) as measured with an instant-read thermometer. If you are using active dry yeast, stir the sugar and yeast into the warm milk and let the mixture sit undisturbed for 4-5 minutes. You’ll know the yeast is active when the mixture becomes foamy on top. Once activated, pour this mixture into a large mixing bowl or the bowl of your stand mixer, then add the salt and an initial 2 1/2 cups of the all-purpose flour. If you are using instant yeast, you can skip the proofing step; simply pour the warm milk directly into a large bowl or your stand mixer. Then, add the sugar, instant yeast, salt, and 2 1/2 cups of the flour.
-
Begin mixing the ingredients thoroughly to combine them. Gradually add the remaining flour, a small amount at a time (you may need up to an additional 1.5 cups), until a soft, slightly tacky dough forms. The dough should clean the sides of the bowl as it mixes but still feel pliable and not overly sticky. Knead the dough using a stand mixer fitted with a dough hook for about 3-5 minutes, or by hand on a lightly floured surface for approximately 10 minutes, until it becomes smooth and elastic. Proper kneading is essential for developing the gluten structure that gives Naan its characteristic chewy texture and allows it to puff beautifully during cooking.
-
Lightly grease a large clean bowl with a little oil or non-stick cooking spray. Place the kneaded dough into the prepared bowl, turning it once to ensure it’s lightly coated on all sides. Cover the bowl loosely with greased plastic wrap or a clean, damp kitchen towel to prevent the dough from drying out. Allow the dough to rest and rise at room temperature for approximately 2 hours, or until it has roughly doubled in size. This slow fermentation process is key for developing a rich flavor in your Naan.
-
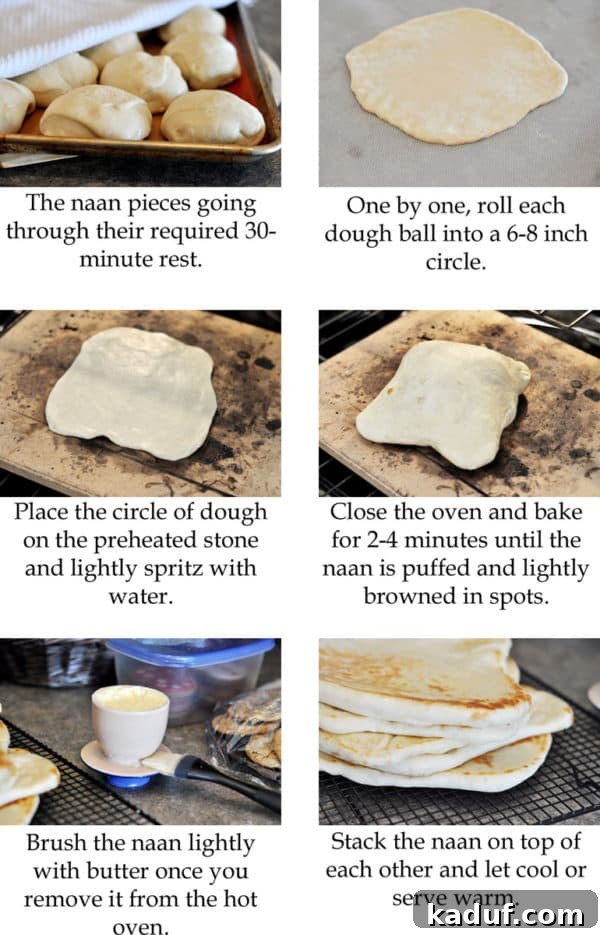
Once the dough has completed its first rise, gently turn it out onto a lightly floured surface. Be careful not to incorporate too much extra flour at this stage, as it can make the finished Naan tough. Divide the dough into 12 equal pieces. For the most consistent results in cooking and appearance, consider using a kitchen scale to ensure each piece weighs roughly the same. Roll each individual piece into a smooth ball. Cover these dough balls with a clean towel and let them rest for an additional 30 minutes. This crucial second rest allows the gluten to relax, making the dough much easier to roll out. During this resting period, preheat your oven to a high temperature, 500 degrees F (260 degrees C), and place a pizza stone on the bottom rack if you have one. If you don’t have a pizza stone, a heavy baking sheet or a cast iron pan can be preheated in the oven or on the stovetop as an excellent alternative.
-
After the dough balls have rested for 30 minutes, take one piece at a time and roll it out into an oval or circular shape, about 6-8 inches wide. The thickness can be adjusted to your preference – a thinner roll will yield a crispier Naan, while a slightly thicker one will be chewier. Carefully transfer the rolled dough onto your preheated hot pizza stone or alternative baking surface. Lightly spritz the top of the Naan with water; this creates steam, which is vital for achieving that characteristic puffiness. Immediately close the oven door and bake the Naan for 2-4 minutes. Watch closely for it to puff up (some pieces will rise more dramatically than others) and develop lovely golden-brown spots on the surface. Remove the baked Naan from the oven and, while still hot, immediately brush it lightly with melted butter for added flavor and a soft finish. As each piece comes out of the oven, stack the hot Naan on top of each other and cover them with a clean towel; this traps steam and keeps them wonderfully soft. Serve your homemade Naan warm, or allow them to cool completely before storing.
Notes
Serving: 1 Naan
,
Calories: 154kcal
,
Carbohydrates: 26g
,
Protein: 4g
,
Fat: 3g
,
Saturated Fat: 2g
,
Cholesterol: 9mg
,
Sodium: 233mg
,
Fiber: 1g
,
Sugar: 2g
Recommended Products
Recipe Source: This outstanding Naan recipe has been adapted slightly from Evil Shenanigans, a wonderful source for culinary inspiration.