
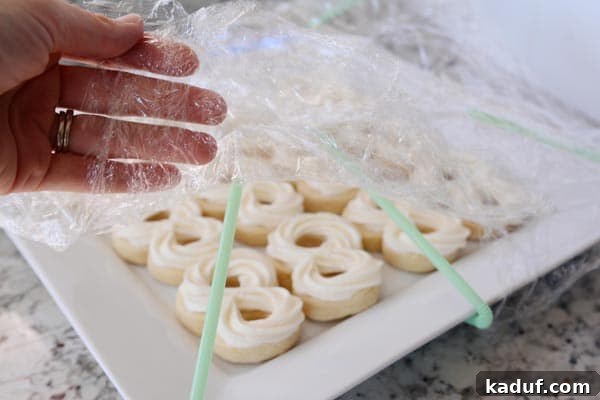
Ever wondered how to cover platters of beautifully decorated cupcakes & cookies without messing them up? Here’s the answer! It’s so simple!
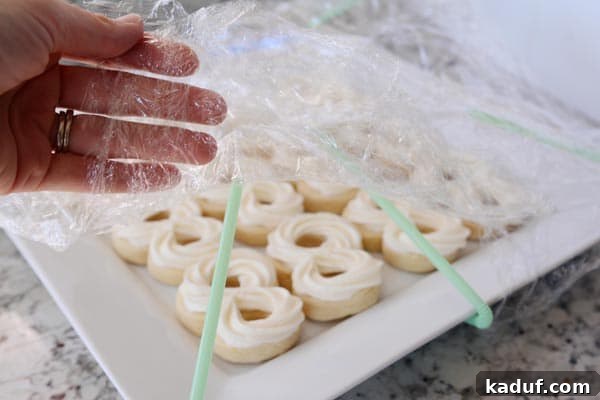
The Ultimate Kitchen Hack: How to Cover Decorated Cupcakes & Cookies Without Ruining Frosting
As passionate home bakers, we pour our hearts and souls into creating stunning, delicious treats. From intricate royal icing designs on sugar cookies to fluffy, piped buttercream swirls on cupcakes, every detail matters. The joy of baking lies not just in the taste but also in the visual appeal of our edible creations. But there’s a common nemesis that often lurks, ready to undo all our hard work in a matter of seconds: the dreaded plastic wrap. How many times have you meticulously arranged a platter of your finest creations, only to have the cling film press down, smudging delicate decorations, transferring colors, and leaving unsightly marks? If this frustrating scenario sounds all too familiar, you’re certainly not alone. This article unveils a remarkably simple yet incredibly effective kitchen hack that will revolutionize how you store and transport your decorated baked goods, ensuring they arrive at their destination as pristine as when they left your kitchen.
The challenge of preserving delicate frosting is a recurring theme for anyone who bakes. Whether it’s for a school bake sale, a festive holiday gathering, a special birthday party, or simply to store overnight for enjoyment the next day, the need for an effective covering method is paramount. We spend precious time mixing, baking, and decorating, only to face the moment of dread when the plastic wrap hovers above our masterpieces. Traditional covering methods often fall short, leading to disappointment and the feeling that all that effort was for naught. This innovative solution offers a practical and elegant way to keep your treats impeccable, ready to delight both the eyes and the palate.
The Universal Decorating Dilemma: Protecting Your Edible Masterpieces
For anyone who has spent hours perfecting a batch of custom cookies or a dozen celebratory cupcakes, the thought of them being ruined is a source of genuine anxiety. We invest time, creativity, and often costly ingredients into making something truly special. The final presentation is a culmination of all that effort, and its preservation becomes crucial. While hard containers are an option, they can be bulky, take up a lot of storage space, and aren’t always available in the perfect size or shape for every platter. Furthermore, specialized containers can be an added expense, and they don’t always cater to unusual sizes or tiered arrangements.
Consider the delicate nature of various frostings. While royal icing offers a sturdy, hard finish that can withstand some pressure, many prefer the soft, creamy texture and richer flavor of buttercream, cream cheese frosting, or ganache. These softer frostings are inherently more vulnerable to damage from direct contact, making the choice of a protective cover even more critical. It’s not just about avoiding smudges; it’s about maintaining the integrity of intricate piping, delicate sprinkles, or carefully placed edible decorations. Even a slight touch can flatten a beautiful swirl or dislodge a tiny edible pearl, diminishing the overall appeal of your hard work.
The need for adequate protection extends beyond just aesthetic concerns. Safeguarding your culinary creations from external elements is crucial for hygiene and freshness. Whether you’re bringing treats to a potluck, a school event, a family gathering, or simply storing them overnight at home, you need to protect them from curious little fingers, dust, pet hair, humidity, and even unexpected insects. An uncovered platter can quickly become unappealing or stale. The challenge is finding a solution that offers robust protection against these threats without compromising the integrity of your artistic endeavors. This is where a little ingenuity and a common household item come into play, offering a “crisis averted” moment for bakers everywhere.
Unveiling the Ingenious Solution: A Simple Straw-Based Canopy
Necessity, as they say, is the mother of invention. Faced with the recurring frustration of ruined frosting and a seemingly endless quest for a better covering method, a moment of inspiration struck. Sometimes, the most brilliant solutions come from the simplest of objects found right in our own homes, objects whose primary purpose seems entirely unrelated to baking. In this case, the humble drinking straw transforms into an indispensable tool for preserving your baked goods. The core idea is brilliantly straightforward: to create a mini-canopy or tent over your decorated treats, preventing any direct contact between the protective covering (like plastic wrap) and the delicate frosting. This method not only safeguards your culinary artwork but also ensures your treats remain fresh and presentable, ready to impress even the most discerning eye.
This ingenious technique effectively lifts the plastic wrap just enough to clear even the tallest cupcake swirls, the most elaborate cookie designs, or delicate cake pops. It creates an invisible barrier, a protective dome that allows for a small pocket of air circulation while keeping unwanted elements out. Forget expensive specialized containers or cumbersome DIY contraptions made from cardboard or complex frameworks; this solution is affordable, easily adaptable to various platter sizes and shapes, and incredibly effective. It’s a true game-changer for anyone who frequently bakes and needs to store or transport their creations without compromising their flawless appearance. The elegance lies in its simplicity and the immediate relief it provides from a common baking headache.
Step-by-Step Guide: Crafting Your Frosting-Friendly Cover
Ready to say goodbye to smudged frosting forever? This method is remarkably easy to implement and requires only a few common household items. Here’s a detailed breakdown of how to construct your very own protective canopy for your decorated cupcakes and cookies, ensuring every treat remains picture-perfect.
Materials You’ll Need:
- A Platter or Tray: Any serving platter, baking sheet, or shallow container you’re using to hold your decorated treats.
- Drinking Straws: Bendy straws are highly recommended for their versatility and adjustable joint. The number needed will depend on the size and shape of your platter.
- Adhesive Tape: Regular clear Scotch tape works well for most surfaces and temporary adhesion. However, blue painter’s tape is an excellent alternative for ensuring no residue is left behind, especially on delicate or cherished platters.
- Plastic Wrap (Cling Film): A standard roll of household plastic wrap will do the job perfectly.
Preparing Your Platter & Straws:
Begin by ensuring your platter of beautifully decorated treats is ready. For optimal results, allow any frosting to set slightly or firm up in the refrigerator for a few minutes, if possible, before attempting to cover. This extra step helps prevent accidental smudges even before the cover is applied. Now, let’s prepare our structural supports:
- Select Your Straws: Opt for bendy straws as their flexible joint is absolutely key to creating the adjustable canopy. For an average-sized square or rectangular platter (approximately 10×10 to 12×12 inches or 25×25 to 30×30 cm), 4 to 6 straws will generally suffice. For larger platters or those with an irregular shape, you might need 6 to 8 straws to ensure adequate support and coverage.
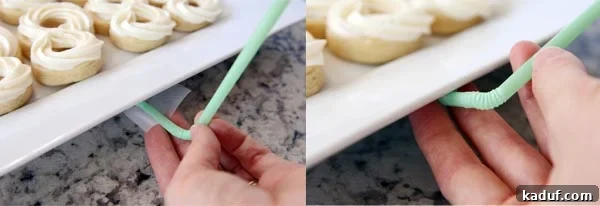
- Attach the Straws: Take one straw and locate the shorter end (the part before the bendy segment). Place a piece of adhesive tape securely onto this short side, ensuring it wraps around the straw slightly to create a firm grip.
- Positioning and Securing: Gently press the taped end of the straw onto the underside of your platter. For a square or rectangular platter, aim to place them along the outer edges – typically two or three on each longer side, spaced evenly. For round platters, position them equidistant around the circumference. Ensure the straw is oriented so that the longer segment can be bent upwards and inwards over your treats, forming the protective arch.
- Molding for Stability: After pressing the tape to the underside, carefully mold the tape around the base of the straw where it meets the platter. This creates a more secure anchor, preventing the straw from wiggling, rotating, or collapsing once the plastic wrap is draped over it. This stability is crucial for maintaining the canopy’s integrity. If using Scotch tape on a ceramic or glass platter, it typically peels off cleanly without residue. However, if you’re concerned about adhesive marks on a particularly delicate or porous surface, blue painter’s tape is a fantastic, residue-free option that provides reliable hold and easy removal.
Building the Protective Canopy:
Once your straws are securely attached to the underside of the platter, it’s time to create the tented structure that will shield your delicate frosting. This is where the bendy nature of the straws becomes invaluable:
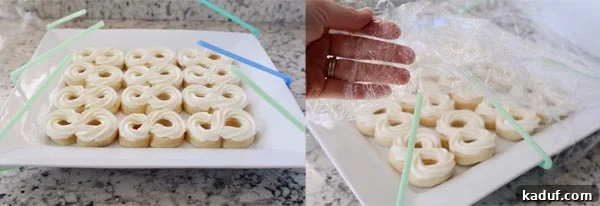
- Bend the Straws Inward: With the straws taped firmly in place, carefully bend the longer segment of each straw upwards and inwards, over your decorated treats. The bendy part of the straw allows for precise shaping. Aim to create an arch or a dome-like structure that sits well above your tallest decorated item. The key objective is to ensure that when the plastic wrap is finally placed, it rests solely on the tips of these elevated straws and never touches the frosting, providing a clear protective space.
- Adjust for Height: For cookies with lower profiles, you might bend the straws more sharply inwards, creating a wider, lower arch. For tall cupcakes with generous frosting swirls, ensure the straws are bent to provide ample height, keeping them as upright as necessary to clear the highest point of your cupcakes. Perform a quick visual check from all angles to confirm that there’s sufficient clearance over every treat.
Gently Applying the Plastic Wrap:
This is the final, crucial step to complete your protective covering. Precision and gentleness are key here to avoid any last-minute mishaps:
- Prepare the Plastic Wrap: On a clean, flat surface like your kitchen counter, unroll and lay out a few pieces of plastic wrap. Overlap them slightly if your platter is particularly wide or long, creating a single, larger sheet that will fully cover the entire straw canopy. This ensures a seamless and secure seal.
- Drape with Care: Gently lift the combined plastic wrap sheet and carefully drape it over the straw canopy. The most important aspect here is to let the plastic wrap rest lightly on the very tips of the bent straws. Avoid pressing down or stretching it tightly, as this could cause the straws to bend inwards too much and potentially touch your delicate treats. The straws act as sturdy pillars, creating an elevated barrier that maintains space between the wrap and your decorations.
- Secure the Edges: Once the plastic wrap is draped over the straws, carefully bring the excess edges down around the sides of the platter. Fold and tuck the plastic wrap tightly underneath the rim or base of the platter. This action secures the cover firmly in place, sealing your treats and protecting them from air, dust, and other contaminants. Ensure there are no large gaps where air or pests could enter.
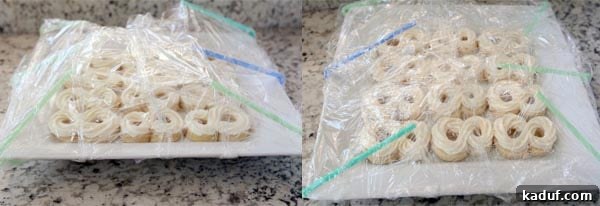
Voila! Crisis averted. You now have a securely covered platter where the plastic wrap doesn’t even come close to your meticulously decorated treats. Your delicate frosting remains untouched, and your hard work is preserved. This simple yet incredibly effective method is a testament to how creative problem-solving can significantly enhance our baking experience, bringing peace of mind and professional-level presentation to every occasion.
Beyond the Basics: Tips for Success & Customization
While the core technique is straightforward, a few additional tips and considerations can help you master this kitchen hack and adapt it to various situations, ensuring consistent success every time you use it.
Choosing the Right Straws:
- Bendy is Best: As mentioned, bendy straws are undeniably ideal due to their adjustable joint, which allows for precise height and angle customization. This flexibility is what makes the canopy truly effective for different heights of baked goods.
- Sturdy Options: While standard plastic straws work remarkably well, thicker, more rigid reusable straws (e.g., silicone-tipped metal straws or even sturdy bamboo straws) might offer even greater stability for very heavy-duty plastic wrap or exceptionally large platters that require more robust support. Just ensure they can be bent or angled effectively to form the desired arch.
- Environmental Consideration: If using disposable straws, consider opting for paper or compostable options to be more environmentally friendly. Alternatively, investing in a set of reusable bendy straws is a sustainable solution for long-term use.
Tape Considerations:
- Painter’s Tape for Peace of Mind: If you’re using precious, antique, or delicate platters that you’re worried about damaging or leaving residue on, blue painter’s tape is highly recommended. It offers excellent adhesion during use but peels off effortlessly without leaving any sticky marks or damaging finishes.
- Double-Sided Tape: For an extra layer of security, especially if your platter has a very smooth, non-porous underside, a small piece of double-sided tape applied to the straw itself before taping it to the platter can enhance stability and prevent any slippage.
- Test First: If you’re unsure about the tape’s effect on your platter, always test a small, inconspicuous area first.
Platter Shapes and Sizes:
- Square/Rectangular Platters: These are often the easiest to work with. Position straws evenly along the longer sides. Three straws per long side for an average platter (totaling 6) usually provides excellent, balanced support.
- Round Platters: For round platters, position straws equidistant around the circumference (e.g., 4 or 6 straws) to create a symmetrical, stable dome. Imagine them like spokes on a wheel, curving inward.
- Large Platters: For exceptionally large platters, you might need to use more straws and potentially overlap several pieces of plastic wrap to ensure full and secure coverage. Consider placing a central straw or two for extra support in the middle of a very wide platter to prevent sagging of the plastic wrap.
- Deep Dishes: If using a deep dish, ensure the straws are long enough to create sufficient clearance above the rim.
Cupcakes vs. Cookies:
- Adjusting Height: This is where the bendy straw’s versatility truly shines. For tall cupcakes with generous frosting, ensure the straws are bent more upright to create a higher clearance. For flatter cookies or brownies, you can bend them lower and wider, creating a more gentle arch. Always perform a quick visual test by holding your hand over the canopy before applying the plastic wrap to ensure adequate space.
Transporting Your Treats:
- Handle with Care: Even with this ingenious protection, always carry your platter carefully, keeping it as level as possible to prevent your treats from shifting internally.
- Car Stability: If transporting in a vehicle, place the platter on a flat, stable surface, perhaps on a non-slip mat or tucked into a sturdy box, to minimize movement during turns, sudden stops, or bumps. Avoid placing it on passenger seats without securing it.
Post-Transport & Cleanup:
- Easy Removal: Once you’ve reached your destination and are ready to unveil your treats, simply lift the plastic wrap gently off the straw canopy. The straws can then be easily peeled off the underside of the platter, leaving no trace behind, especially if you used painter’s tape.
- Reusable Straws: If you used reusable straws, simply clean them and store them for your next baking adventure!
Why This Simple Hack Is a Game-Changer for Bakers
In the world of baking and confectionery, presentation is often as important as taste. A visually appealing dessert can elevate any occasion and showcase the skill and dedication of the baker. This seemingly small kitchen hack addresses a significant pain point for countless home bakers and professional pastry enthusiasts alike. By adopting this straw-and-plastic-wrap method, you’re not just covering food; you’re safeguarding your investment of time, skill, and creativity. It eliminates one of the most common anxieties associated with preparing decorated treats.
The benefits are manifold: no more wasted frosting, no more frustrating last-minute re-decorating, and significantly reduced stress when preparing for events. Your cookies, cupcakes, and other delicate baked goods will maintain their perfect, freshly decorated appearance, whether they’re stored overnight, travel across town for a party, or sit on a buffet table awaiting eager guests. This simple act of creating a protective canopy elevates your presentation, ensuring that every treat looks as good as it tastes. It empowers you to confidently prepare your masterpieces in advance, knowing they will remain pristine until serving time, allowing you to focus on other aspects of your event or simply enjoy the fruits of your labor without worry.
It’s true, this isn’t rocket science, nor is it a world-changing invention that will solve global crises. But in the realm of everyday kitchen challenges, finding such an elegant, affordable, and effective solution for a persistent problem is incredibly satisfying. It’s a testament to how sometimes, the simplest ideas yield the greatest results, bringing a little extra joy, efficiency, and peace of mind to our culinary pursuits. So, the next time you’re facing a platter of beautifully decorated treats and the daunting prospect of covering them, grab some straws, and experience the pure delight of perfectly preserved frosting. Happy baking!