
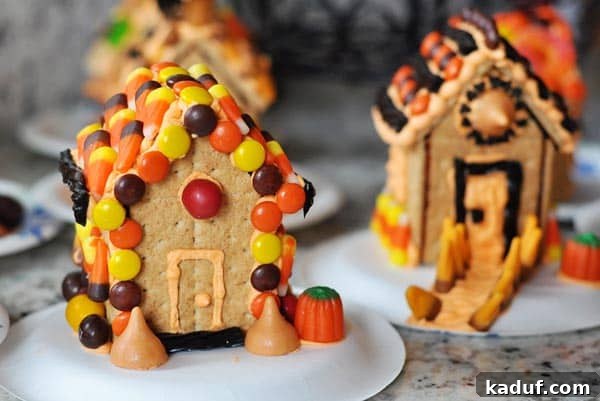
Simple Homemade Haunted Halloween Houses {Plus a Revolutionary New Way to Stick Them Together!}
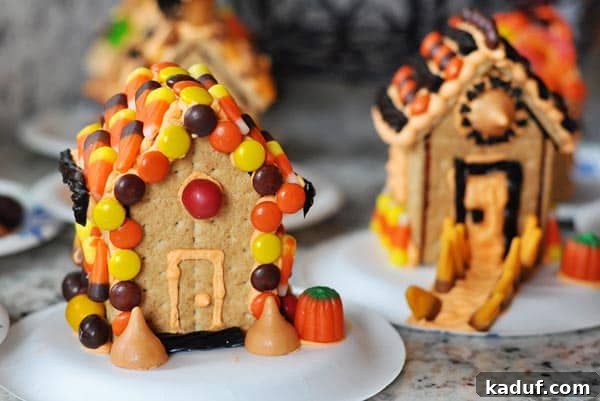
Crafting Spooky Edible Fun: Your Ultimate Guide to DIY Haunted Graham Cracker Houses
Are you ready to immerse yourself in the enchanting and slightly spooky spirit of Halloween? There’s no better way to kick off the festive season than with a fun, engaging, and utterly delicious family activity. These simple DIY haunted Halloween houses, made from humble graham crackers, are not just a craft; they’re an experience designed to spark creativity and provide lasting memories. Best of all, they’re surprisingly easy to assemble and will captivate the imaginations of your little ones for hours, not just minutes!
Revolutionizing Edible Construction: The Burnt Sugar Method
For years, crafting edible houses has been a beloved tradition, whether for Halloween or Christmas. However, anyone who has attempted to build a gingerbread or graham cracker house knows the frustrations that often come with traditional adhesives. Icing, while edible and decorative, often struggles to hold structures together firmly, leading to collapses before the decorating even begins. Royal icing offers more stability but still requires patience and often external supports like rubber bands during drying. On the other hand, non-edible options like hot glue, while effective, completely defeat the purpose of creating a treat meant to be enjoyed. The joy of a fully edible creation is paramount for many.
That’s why I was absolutely thrilled to discover a game-changing technique shared by my dear friend, Kate. Her mother, renowned for her incredible culinary skills (including the best cinnamon pull-apart bread imaginable), always used burnt sugar to assemble their holiday houses instead of icing. Intrigued by this novel approach, I decided to give it a try. And let me tell you, it wasn’t just good; it was revolutionary! This method is a total game-changer, simplifying the assembly process and creating incredibly sturdy structures that are 100% edible. I am excited to share every detail and show you exactly how to transform your edible house-building experience forever.
While this burnt sugar method is fantastic for homemade gingerbread – a technique I eagerly plan to use for our annual Christmas sled tradition – it truly shines when you need a quick and efficient solution. This time, with 15 energetic kids eagerly awaiting their houses, the idea of baking homemade gingerbread simply wasn’t feasible. Graham crackers became the perfect, convenient, and equally charming foundation for our Halloween creations.
Mastering the “Burnt Sugar” Glue: Your Step-by-Step Guide
The secret to these incredibly sturdy houses lies in perfectly caramelized sugar. Here’s how to prepare this magical edible adhesive:
- Prepare Your Pan: Start with a large, heavy-bottomed skillet. A stainless steel or cast iron pan is ideal because it allows you to easily observe the sugar’s color change, unlike a non-stick pan which might obscure the process.
- Add the Sugar: Pour 1 to 2 cups of granulated sugar into the skillet. The quantity depends on how many houses you plan to make and how much “glue” you anticipate needing.
- Heat Gently: Place the skillet over medium-low heat. Patience is key here. Resist the urge to stir or move the pan around. Allow the heat to work its magic slowly and evenly.
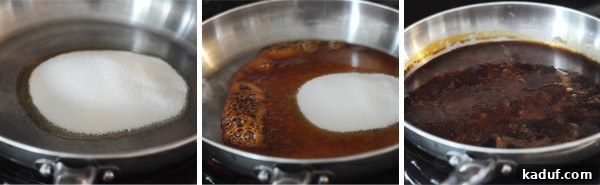
- Watch for Caramelization: In about 15 minutes, you’ll notice the sugar at the edges beginning to melt and turn amber. As it progresses, it will fully caramelize into a beautiful, golden-brown liquid.
- Troubleshooting Tip: If you start to smell burning sugar or see smoke before it’s fully melted, your heat is too high. Immediately reduce the heat to low. The goal is a rich caramel, not burnt sugar that sets off smoke alarms. The image below illustrates how the sugar bubbles on the edges while the center still needs to melt; this is a good moment to adjust the heat downwards if it’s too vigorous.
- Maintain Consistency: Once the sugar has completely melted and reached a beautiful caramel color, keep the skillet over very low heat. This prevents the sugar from hardening too quickly, allowing you ample time to work with it as your edible adhesive.
A Crucial Safety Warning: Please exercise extreme caution when working with hot sugar. Melted sugar can reach very high temperatures and cause severe burns if it comes into contact with your skin. Always handle the skillet and the sugar with care, and supervise children closely if they are involved in the assembly process.
Crafting Your Walls: Essential Graham Cracker Trimming Techniques
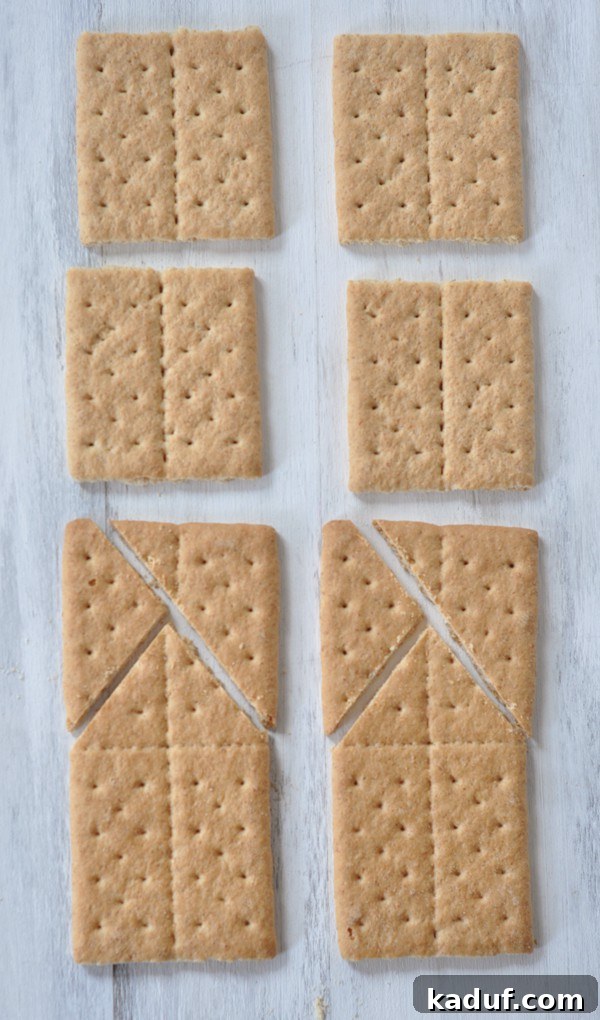
While your sugar is melting, it’s the perfect time to prepare your graham cracker components. Each house will require four rectangular graham crackers, which you will transform into walls and roof pieces.
- Forming the Base Walls: Take two of your graham crackers and carefully break them along their center seam. This will yield four perfect square pieces, which will form the main side walls of your house.
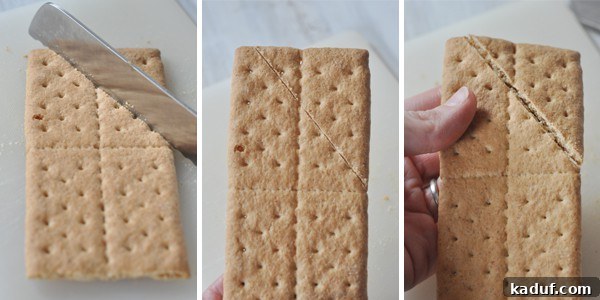
- Creating the Gable Ends (Roof Supports): The other two rectangular graham crackers will become the front and back gable ends of your house, which support the roof. These need to be trimmed as shown in the picture below, creating a triangular peak.
Expert Trimming Tips to Save Your Sanity (and Your Graham Crackers!):
- Tip One: The Right Tool Makes All the Difference. Do not attempt to use a butter knife or a dull blade. A sharp serrated knife is your best friend here. Its teeth will grip the cracker and create a cleaner cut.
- Tip Two: Gentle Does It. Think of a gentle sawing motion, not a forceful chop or a “horror movie hacking” action. Graham crackers are delicate; brute force will only result in crumbling.
- Tip Three: Score, Don’t Slash. Instead of trying to cut all the way through the graham cracker in one go, simply score a line about halfway through its thickness. Once you have a clear score line, gently press on the cut pieces to break them apart. This method ensures crisp, straight edges and minimizes breakage.
Assembling Your Haunted House: The Burnt Sugar Advantage
Now for the exciting part: putting your house together! The beauty of the burnt sugar method is its rapid hardening, which means you’ll have a sturdy structure in minutes. Before you begin, ensure all your graham cracker components are laid out and within easy reach, and crucially, keep your skillet of melted sugar over very low heat to prevent it from solidifying.
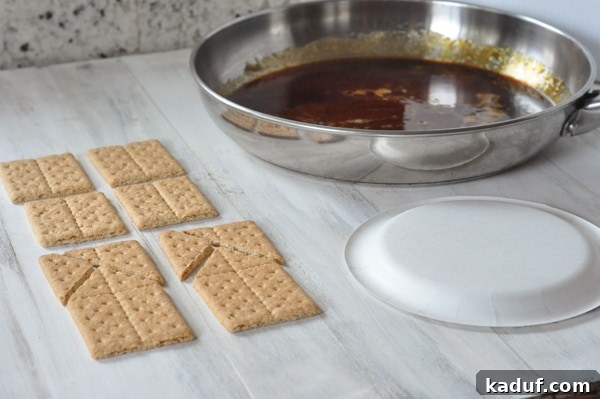
Remember: Hot sugar is incredibly hot! Please be extremely careful to avoid burns to your fingers. Consider using tongs or wearing heat-resistant gloves if you are particularly sensitive or working with very young children.
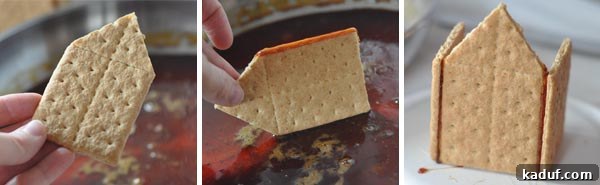
- First Walls Up: Take one of your trimmed gable pieces (the one with the triangular peak). Carefully dip both of its bottom edges into the melted sugar. Then, gently attach a square graham cracker piece to each sugared edge, pressing lightly to adhere. Don’t worry if a little sugar drips onto your plate; it will snap off easily once hardened.
- Completing the Base Structure: Now, take your second trimmed gable piece. Dip both of its bottom edges into the melted sugar. Working quickly, set this piece between the open ends of your partially assembled house. Gently press the square side walls against the sugared edges to stick everything firmly together. You’ll immediately feel the sugar harden, creating a strong bond.
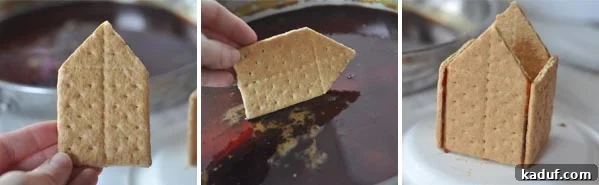
- Allow to Set Briefly: At this stage, allow your house to sit for 1-2 minutes. This brief pause gives the sugar a moment to fully solidify and ensures the base structure is incredibly stable. You can even start assembling the base of another house during this short waiting period.
- Prepare for the Roof: Once the base is slightly set, carefully pick up the entire house. Dip the top triangular pieces and any open edges along the top into the melted sugar. A quick dip on each side is sufficient; the sugar doesn’t need to cover every inch, just enough to create a strong adhesive surface for the roof.
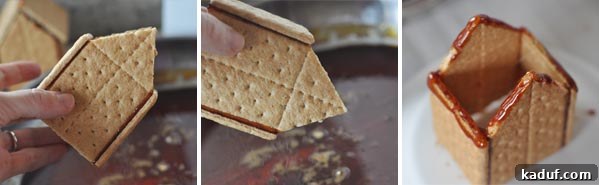
- Attaching the Roof: Working quickly while the sugar is still liquid, attach the two remaining square graham cracker pieces (your roof panels) to the top of the house. Press lightly but firmly to secure them. The sugar will harden almost instantly, locking your roof into place.
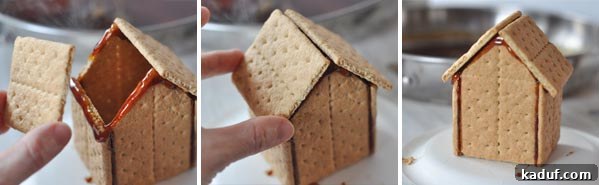
And just like that, within about 5 minutes, your haunted graham cracker houses are structurally complete and ready for decorating! One of the fantastic advantages of this method is the ability to assemble houses days in advance, making party preparation a breeze.
Decorating Your Spooky Masterpiece
With your sturdy graham cracker houses ready, it’s time for the fun to begin! For decorating, I always recommend royal icing. Made from meringue powder and prepared according to the package directions, royal icing dries hard and provides an excellent canvas for all your spooky designs. Gather an assortment of candies, sprinkles, edible glitter, and any other edible embellishments you can imagine.
We recently hosted a decorating party, and the joy was infectious. All eight boys and two girls had an absolute blast transforming their simple graham cracker structures into delightfully scary, yet undeniably cute, haunted houses. Of course, the best part of any edible craft is the eating, and these houses were devoured with gusto!
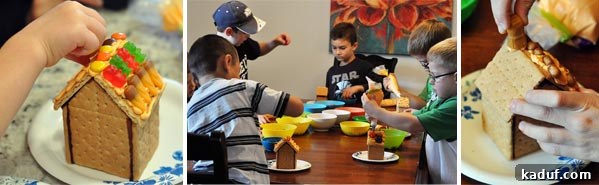
While these houses are perfect for Halloween, the concept is incredibly versatile. Simply swap out your ghoulish candies for festive reds, greens, and whites, and these would be just as charming as Christmas gingerbread houses. The possibilities for creative expression are endless!
Why Burnt Sugar is Your New Go-To for Edible Construction
I can confidently say that after experiencing the burnt sugar method, I will never assemble any type of edible contraption – whether it’s a gingerbread house, a sled, or any other structural treat – using anything else. The benefits are simply unparalleled:
- Instant Hardening: Unlike icing that requires lengthy drying times, burnt sugar hardens almost instantly. This means you can move from assembly to decorating within minutes, significantly speeding up the crafting process.
- Unmatched Strength: The bond created by caramelized sugar is incredibly tough, akin to edible cement. Your houses will be far more sturdy and less prone to collapsing than those assembled with traditional icing.
- No External Support Needed: Forget about propping up walls with rubber bands, cans, or other makeshift supports. The immediate strength of the burnt sugar means your structure stands firm on its own, right from the start.
- Fully Edible: Enjoy the satisfaction of a completely edible creation. There’s no need to worry about non-food items being part of your delicious display.
- Time-Saving: The efficiency of this method saves you valuable time and eliminates the frustration often associated with edible construction.
It’s truly brilliant – a simple, effective, and entirely delicious solution to a common crafting challenge. Prepare to be amazed by the durability and ease this method brings to your holiday and seasonal projects.
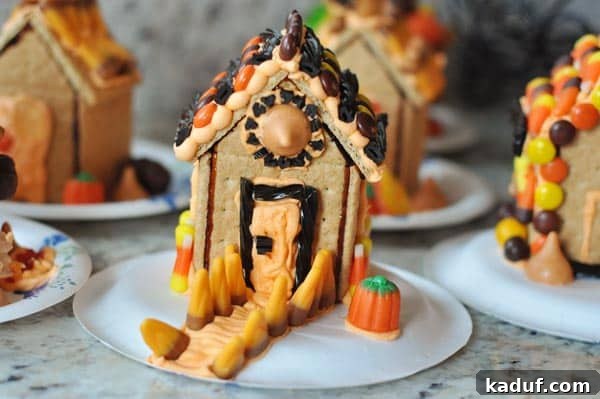
Explore More Halloween Delights!
Ready for more spooky inspiration? Dive into a world of enchanting Halloween food ideas and recipes. Whether you’re planning a party or just looking for fun, festive treats, there’s a treasure trove of culinary delights waiting for you!